Home
Tips - Pumphouse
Jump to
instructions
for changing the pumphouse filter.
Jump to
instructions
for winterizing the pumphouse.
Jump to
instructions
for un-winterizing the pumphouse.
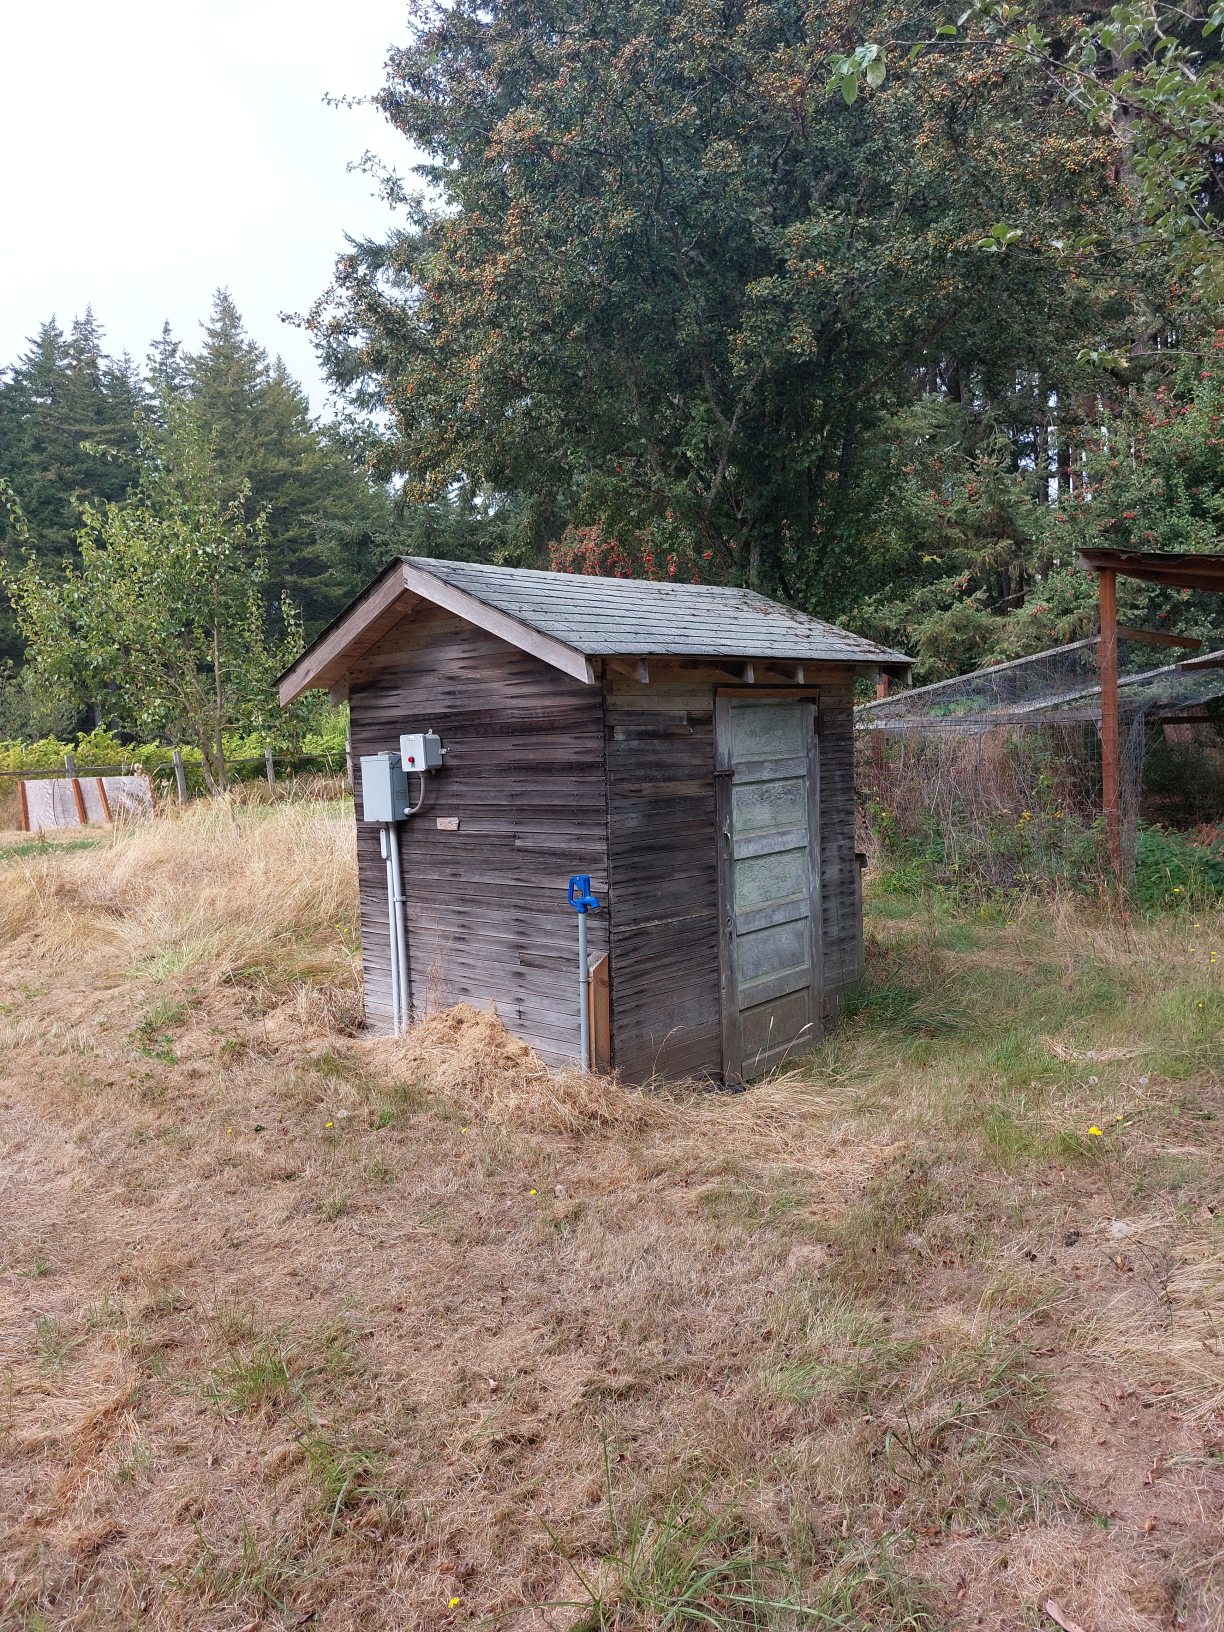
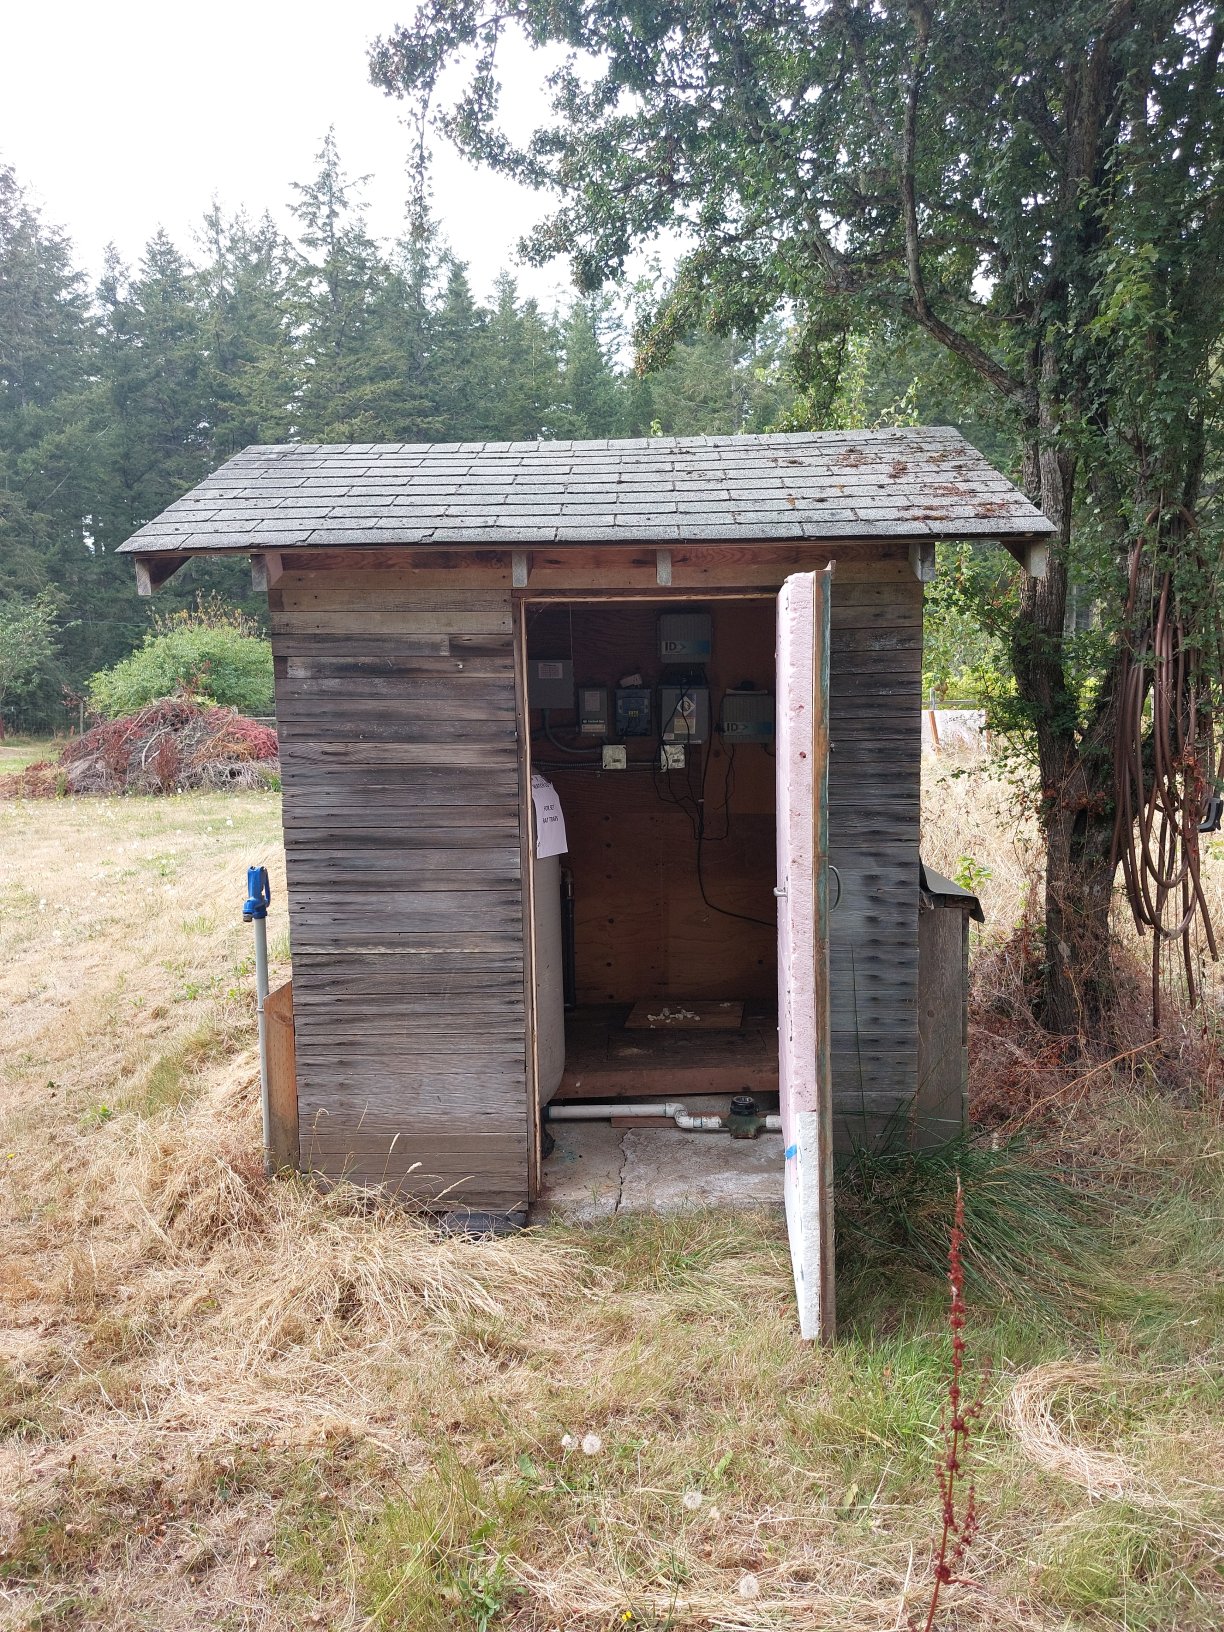
Pumphouse
The pumphouse is a small wooden shed sitting roughly 100 feet east
of the vineyard. It sits on top of a well, presumably the newer of
the two wells on the property. I have no idea what the large variety
of irrigation pipes and equipment in the pumphouse does. However,
here's what I do know:
The pumphouse allows access to the well. Because of this it's a
pretty dangerous place, and kids definitely shouldn't be allowed inside
unsupervised. It has a combination padlock on the door ... combo is 0000. Please lock
it back up when you're done.
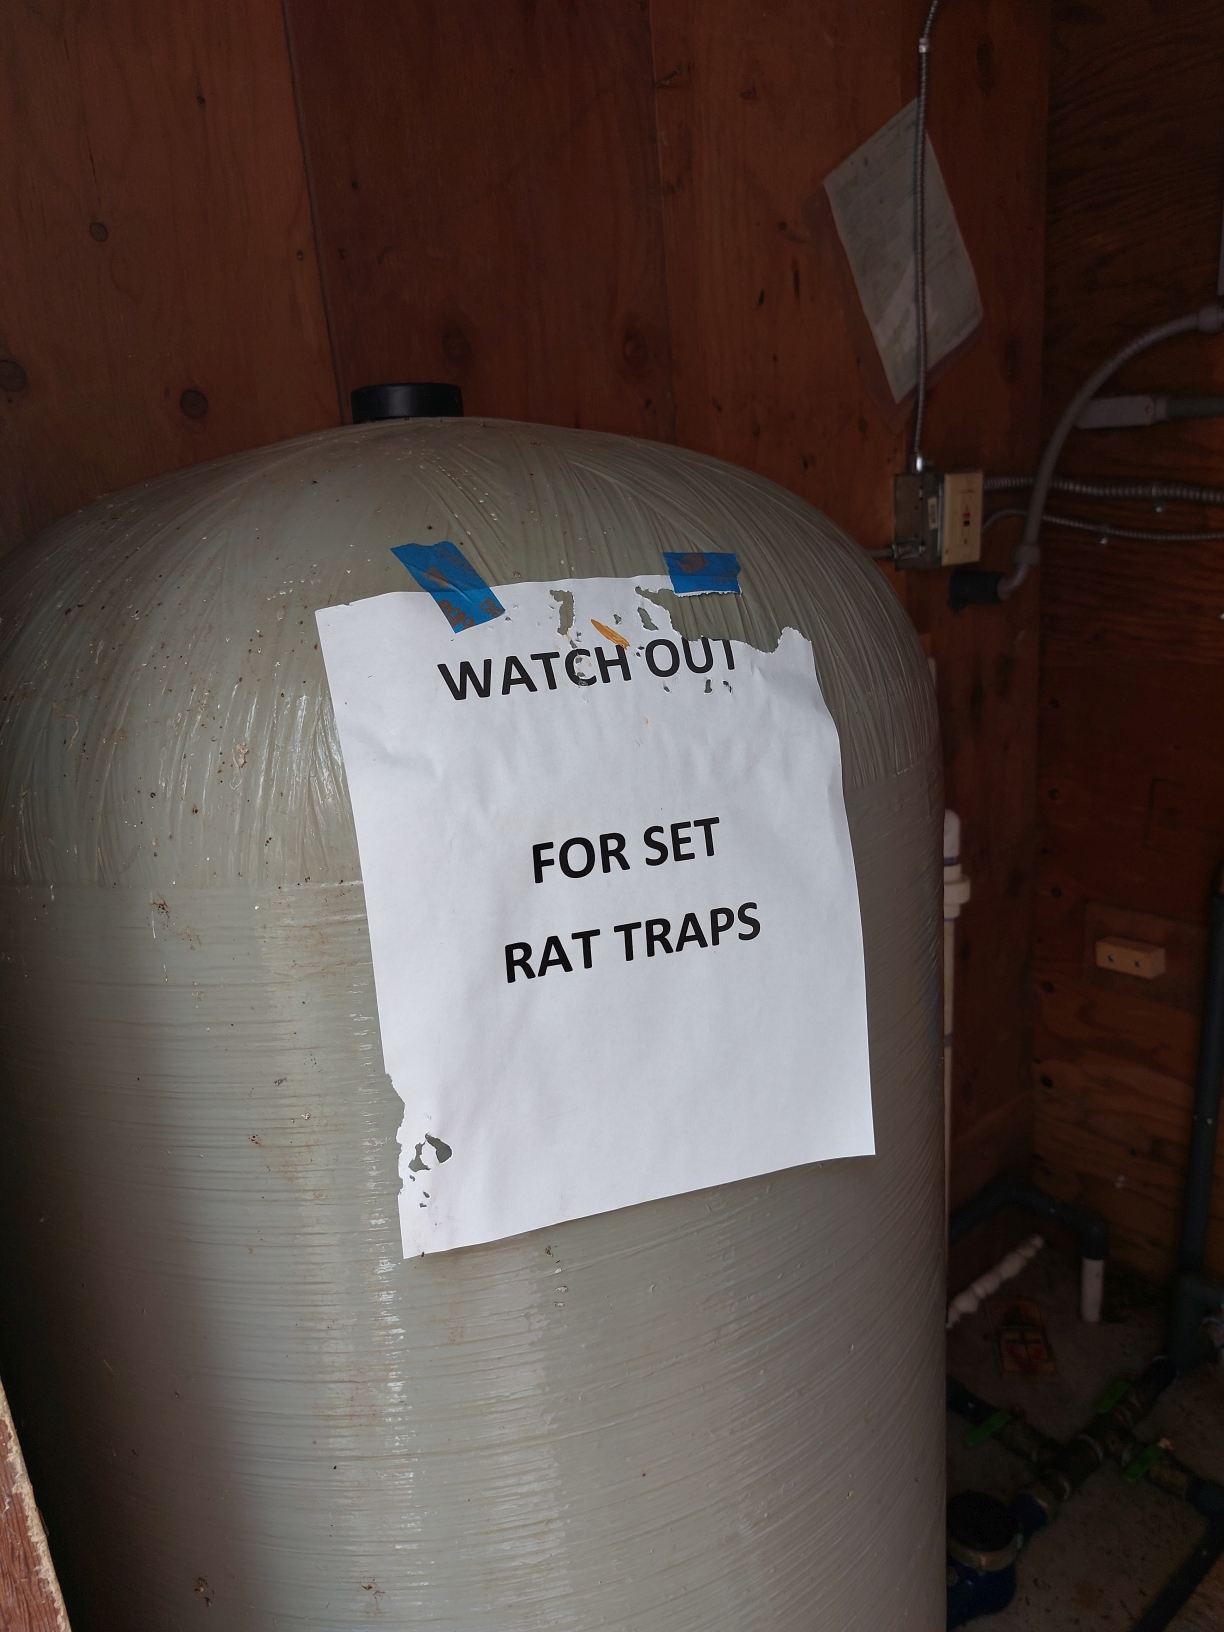 Just to the left inside the door is a large pressurized water tank.
On it is a warning to watch out for the two "set" rat traps on the
floor among the pipes. (I don't want to put rat poison in the
pumphouse.) Watch out for those as you fiddle around.
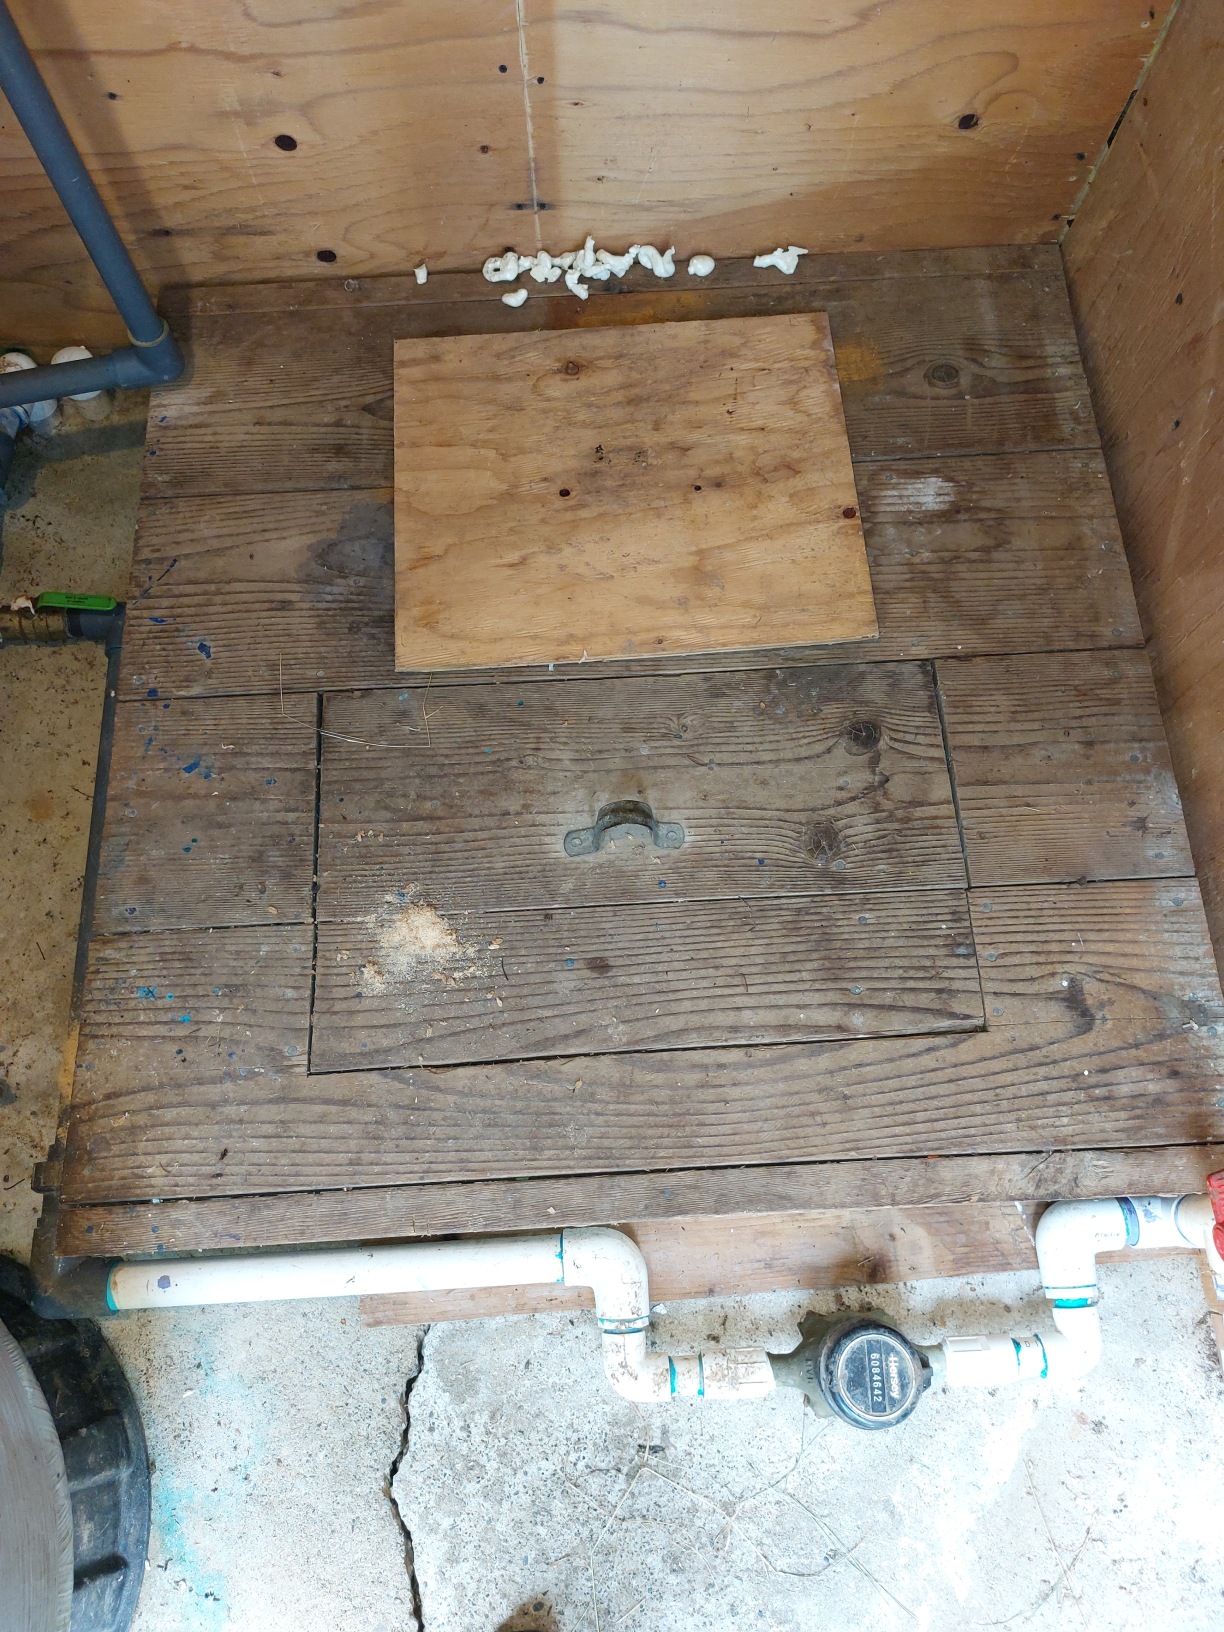 Directly ahead of you as you stand in the doorway is the large wooden well cover.
Both the wooden lid with the handle and the loose piece of plywood behind it
open onto a very deep well. Go slow and careful in there.
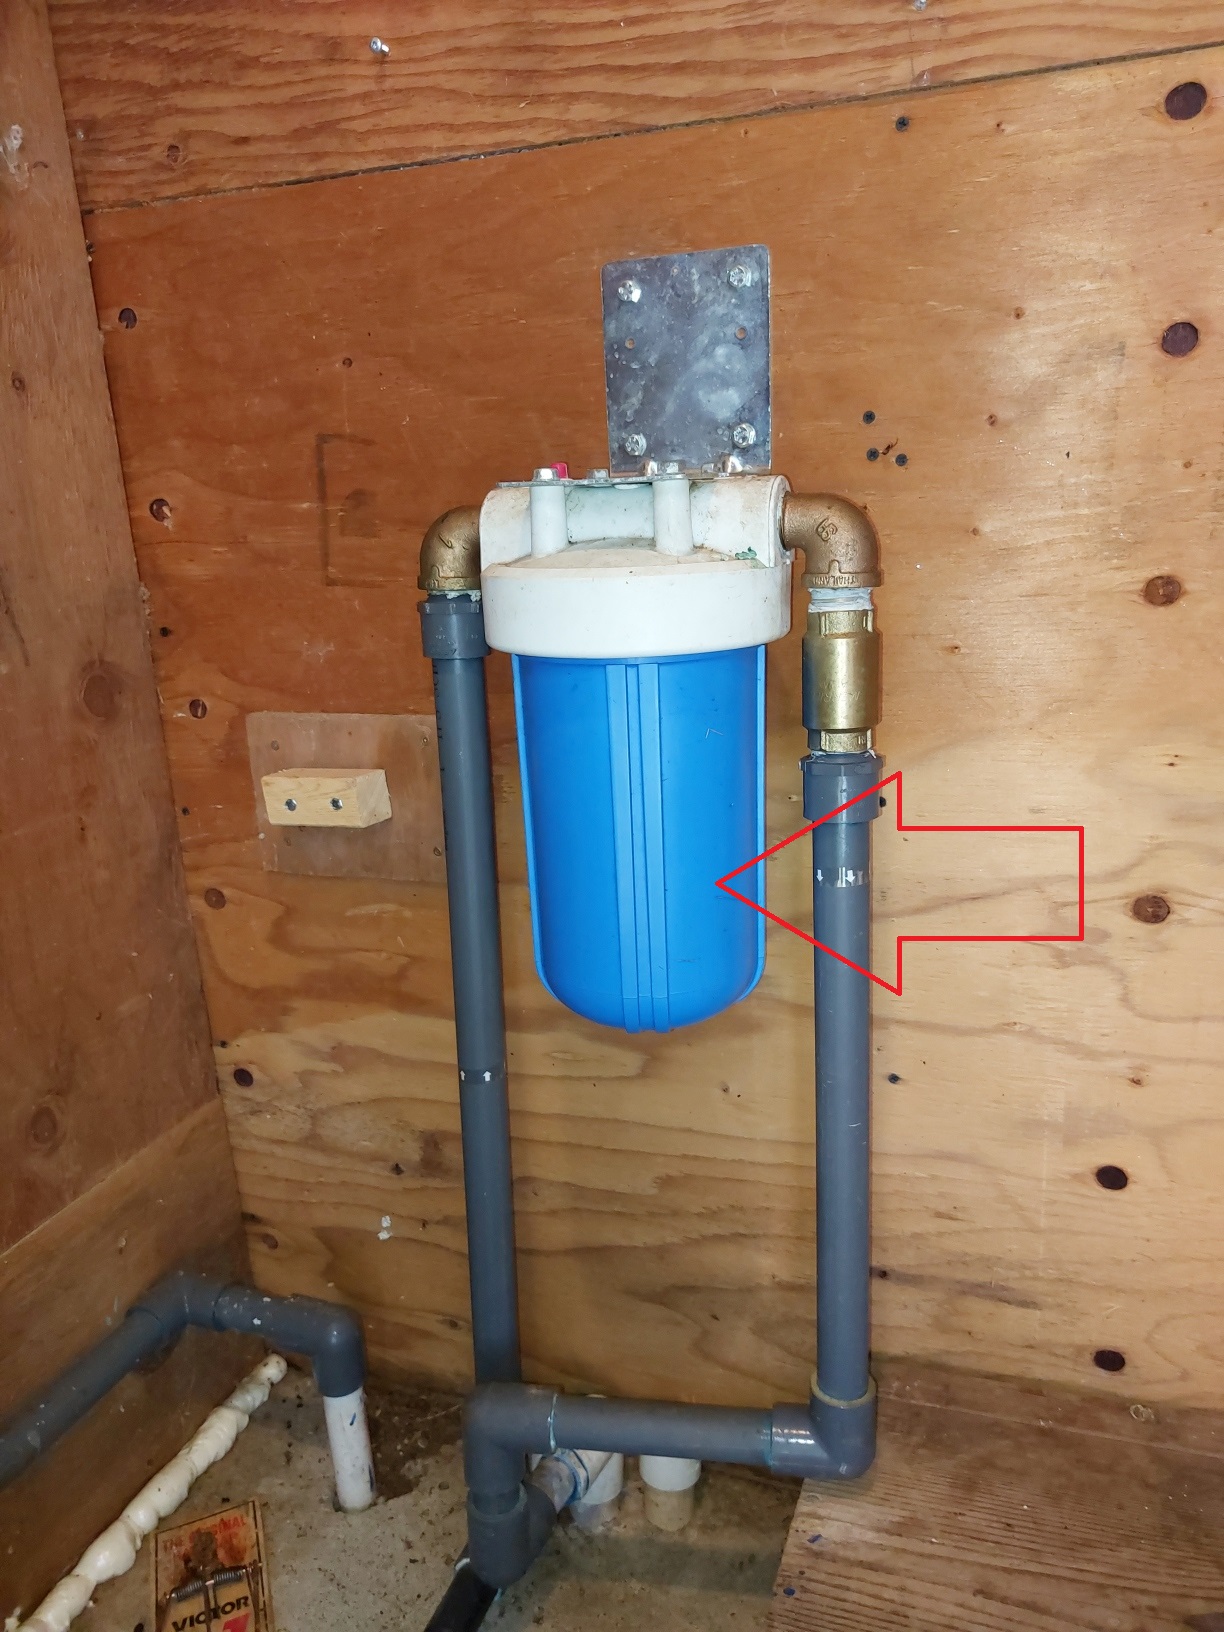 On the left side of the opposite wall is a bright blue filter housing
containing the primary filter for the house water. The filter
needs to be changed on a regular basis - see
instructions
below.
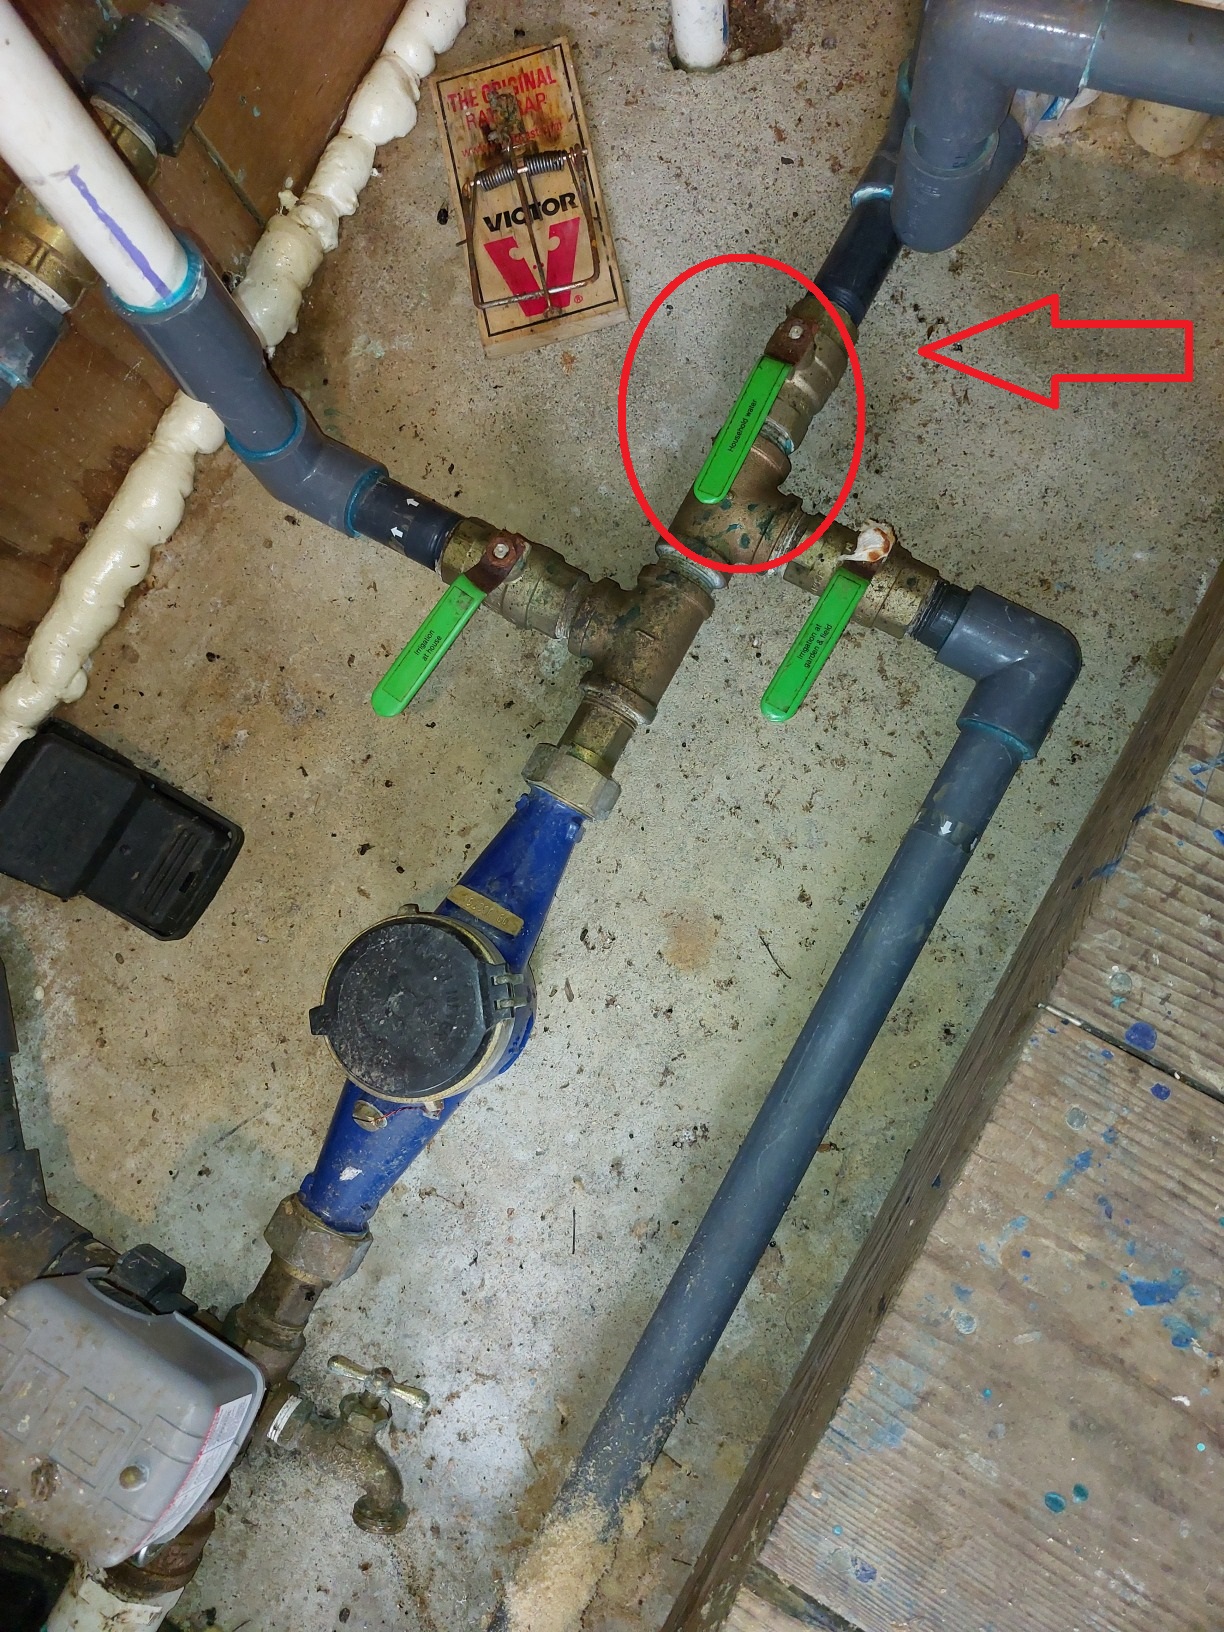 The pipe exiting the bottom of the water tank passes thru a meter and
then branches into three pipes: one to the left, one straight ahead,
and one to the right. Each of the three branches has its own labeled
green-handled shutoff valve - as seen in the pic with this paragraph. The branch that
goes straight leads to the bright blue filter mentioned above, i.e., that's the main
line that goes to the house. Its green-handled shutoff valve is labeled
"Household water".
Notice in the pic that its handle is "in line" with the pipe - i.e.
the valve is open. To shut the house water off, turn the handle a quarter turn
so that it's at a right angle to the pipe.
(Notice also in the pic that the other two shutoff valves are
closed because they are at right angles to their respective pipes.)
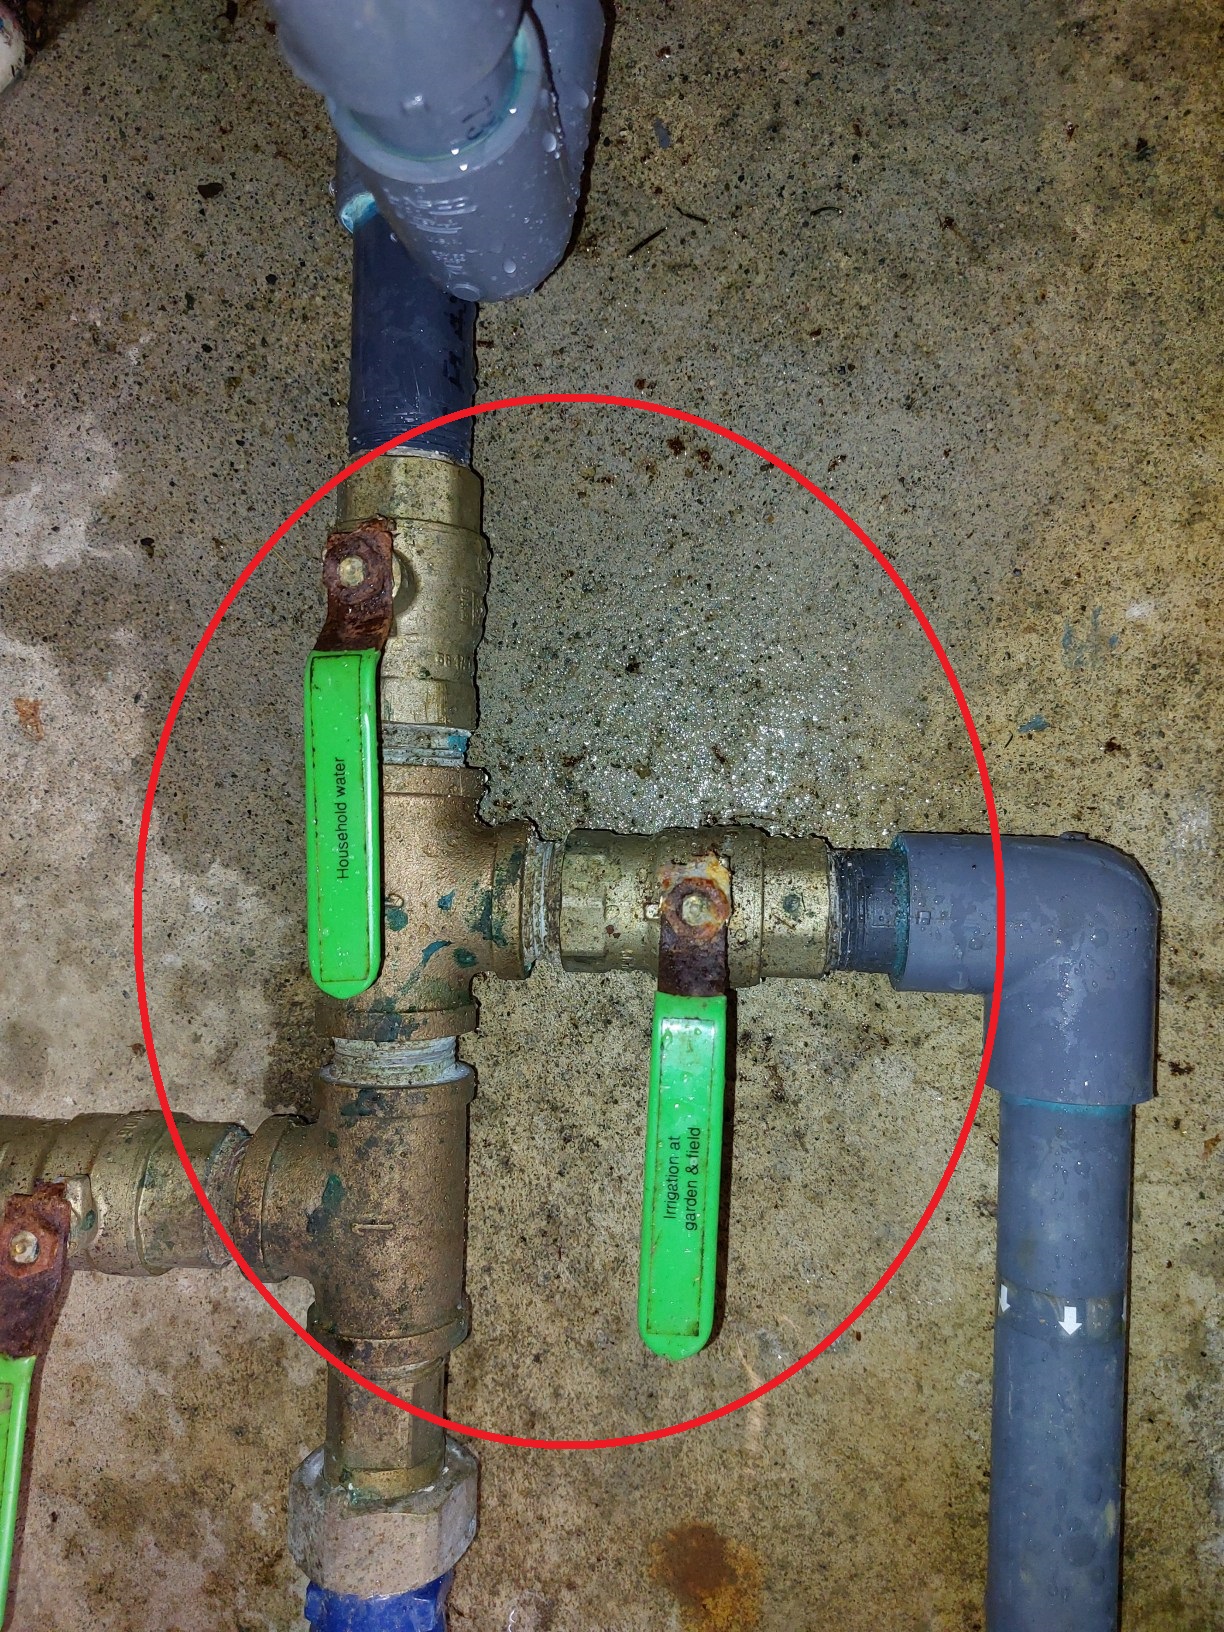
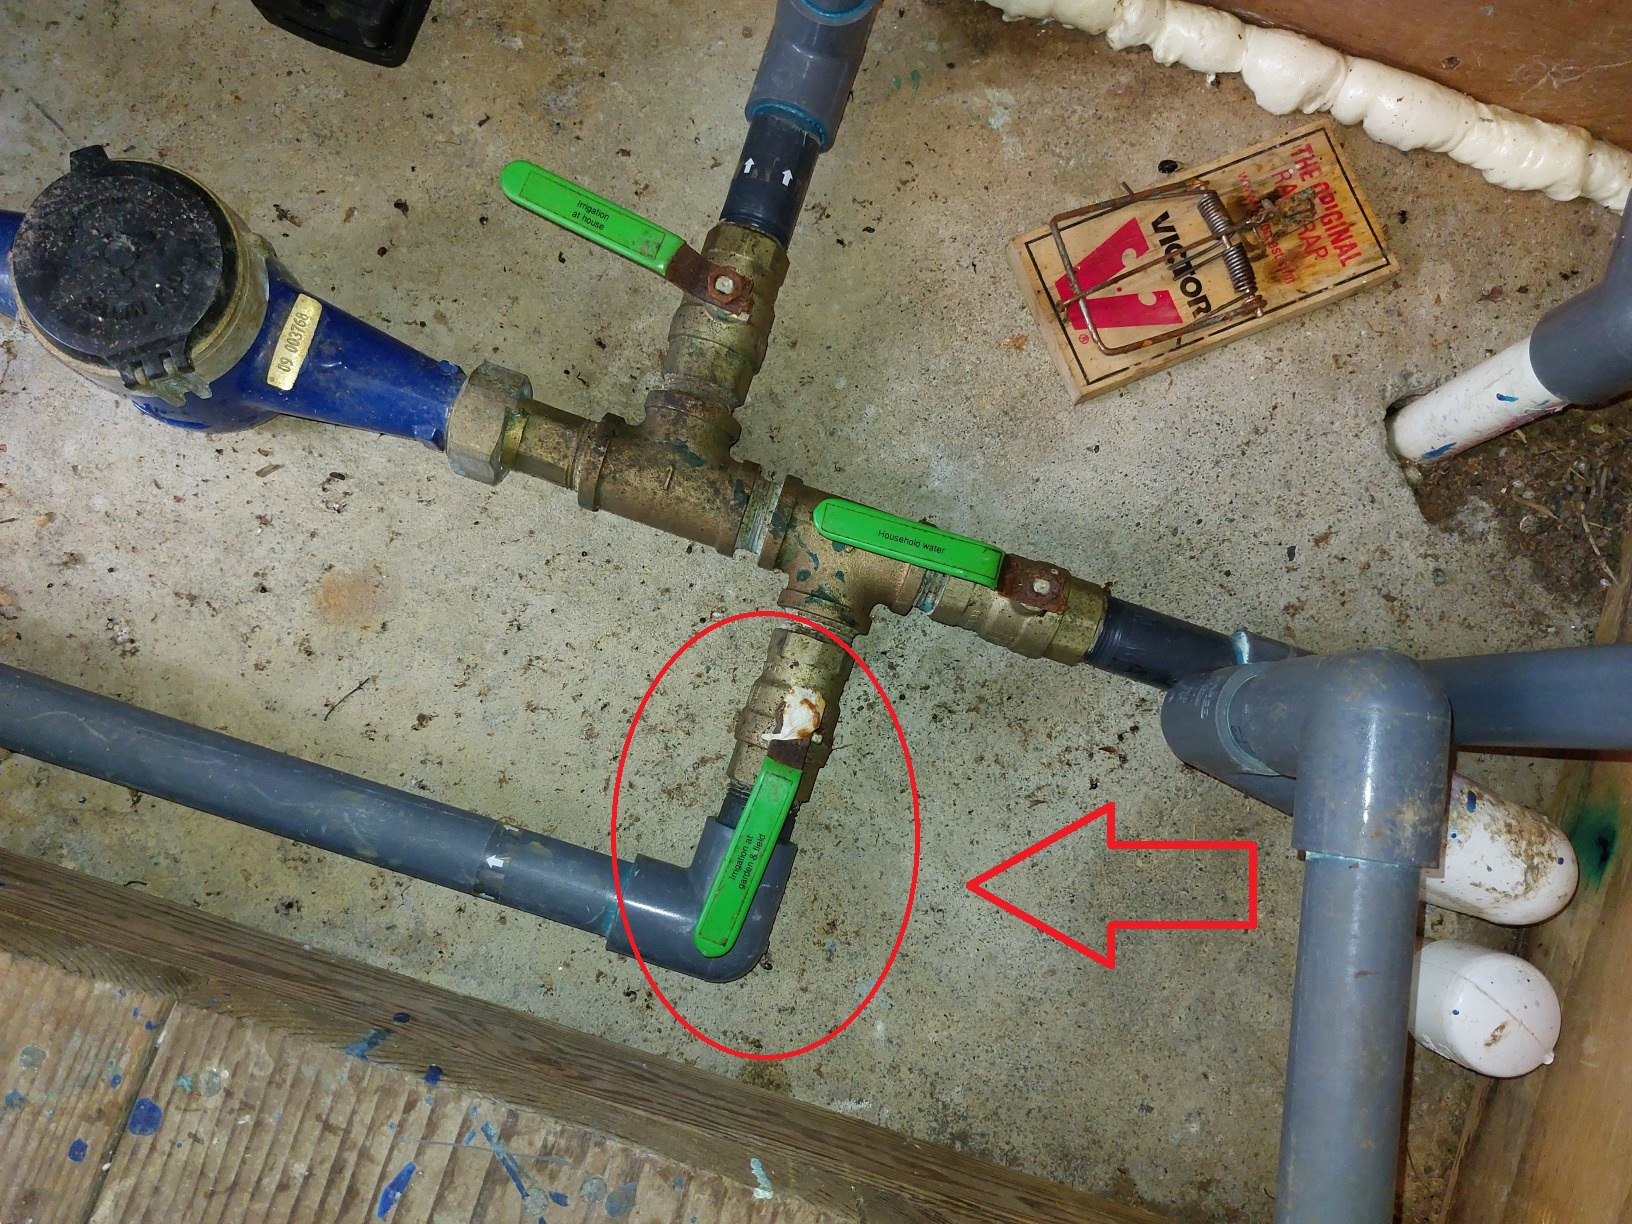 The pipe that branches to the right (circled in red in this paragraph's pic)
feeds the two standpipes at the
corners of the vineyard, plus the standpipe just outside the pumphouse
itself. Its green handle is labeled "Irrigation at garden & field".
Its shutoff valve was closed in the previous paragraph's pic. If you open
the right-hand branch's shutoff valve by turning its handle "in line"
with the pipe, water will then flow to the standpipes. In this paragraph's pic
the standpipes water is turned on. (Please turn the valve
off when you're done using the standpipes.)
The green-handled shutoff valve on the pipe that branches to the left
is labeled "Irrigation at house".
I'm not sure what that does.
Pumphouse Supplies
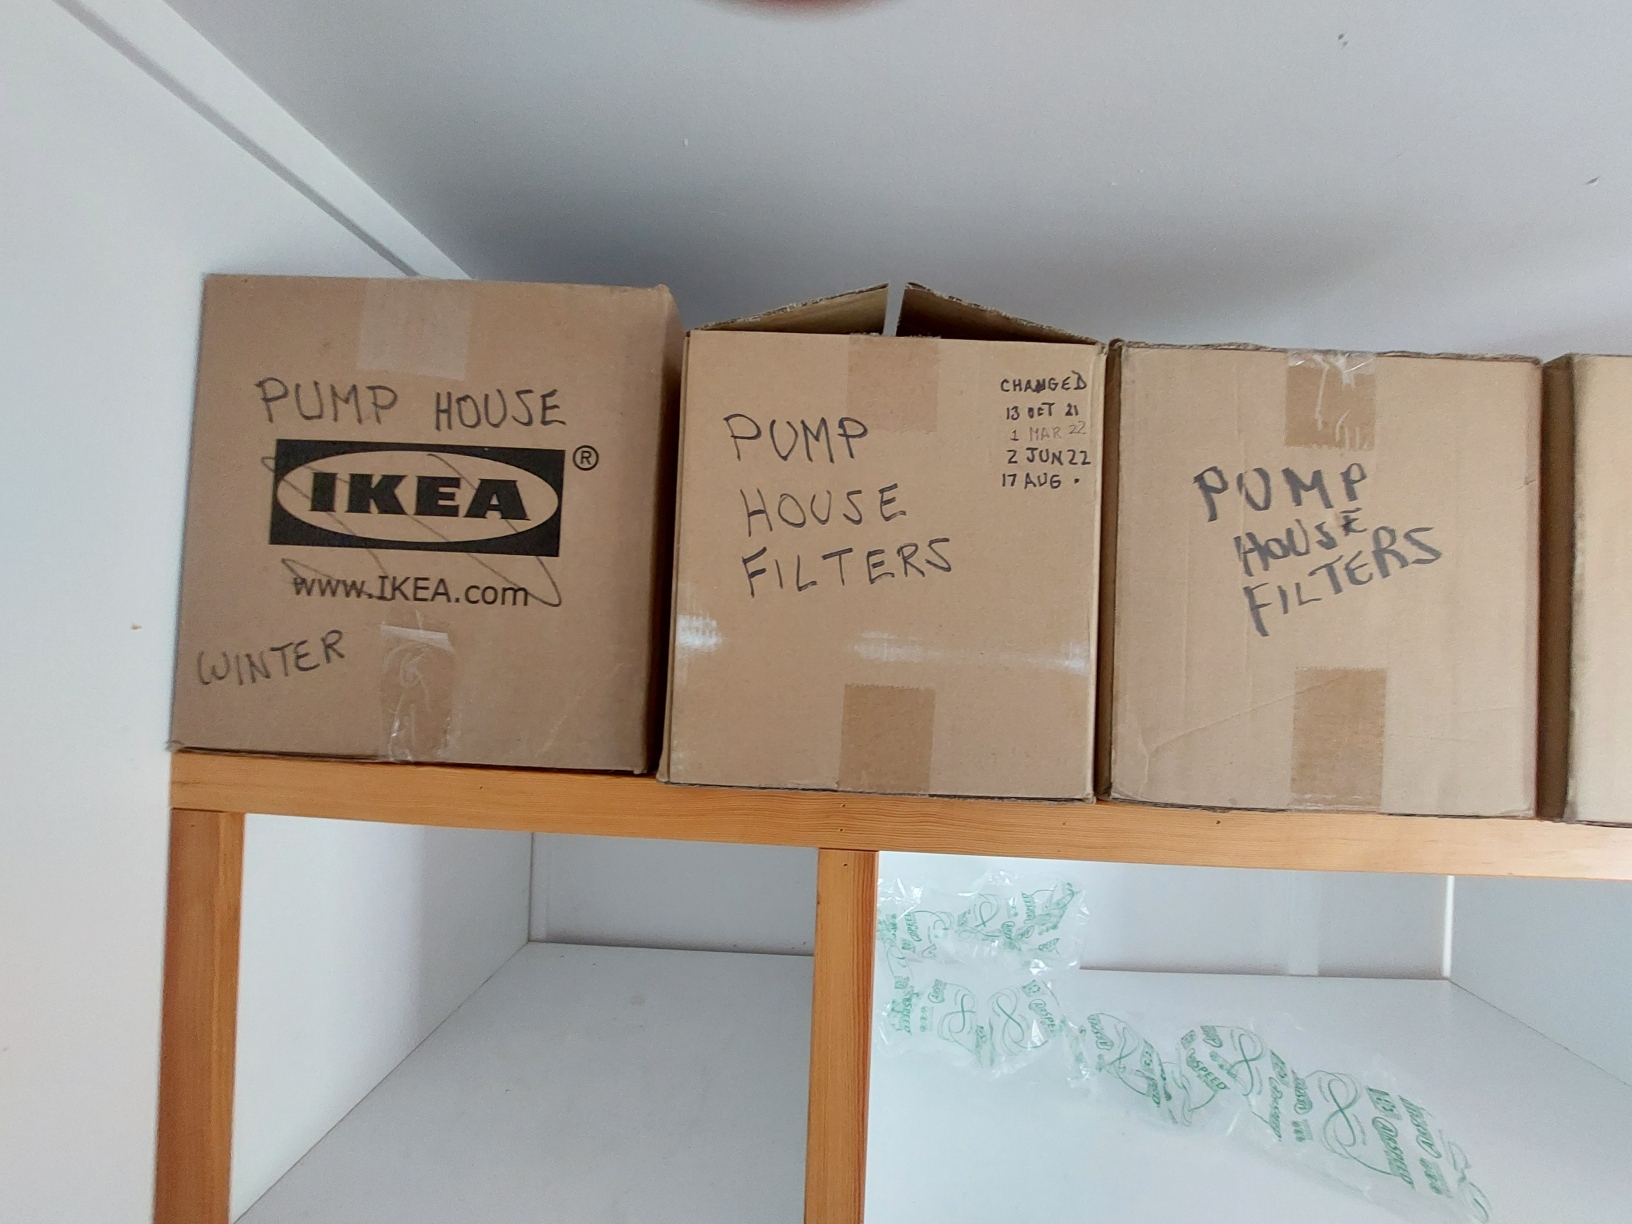 The various pumphouse supplies are kept in boxes in the hot tub house.
There's one box containing various things needed to "winterize" the
pumphouse (i.e. keep it from freezing). See
winterizing
instructions below. The other boxes contain replacement filters for the bright
blue filter in the pumphouse - along with some supplies used when
changing the filter. See
changing the pumphouse filter
instructions below.
Pumphouse Circuit Breaker
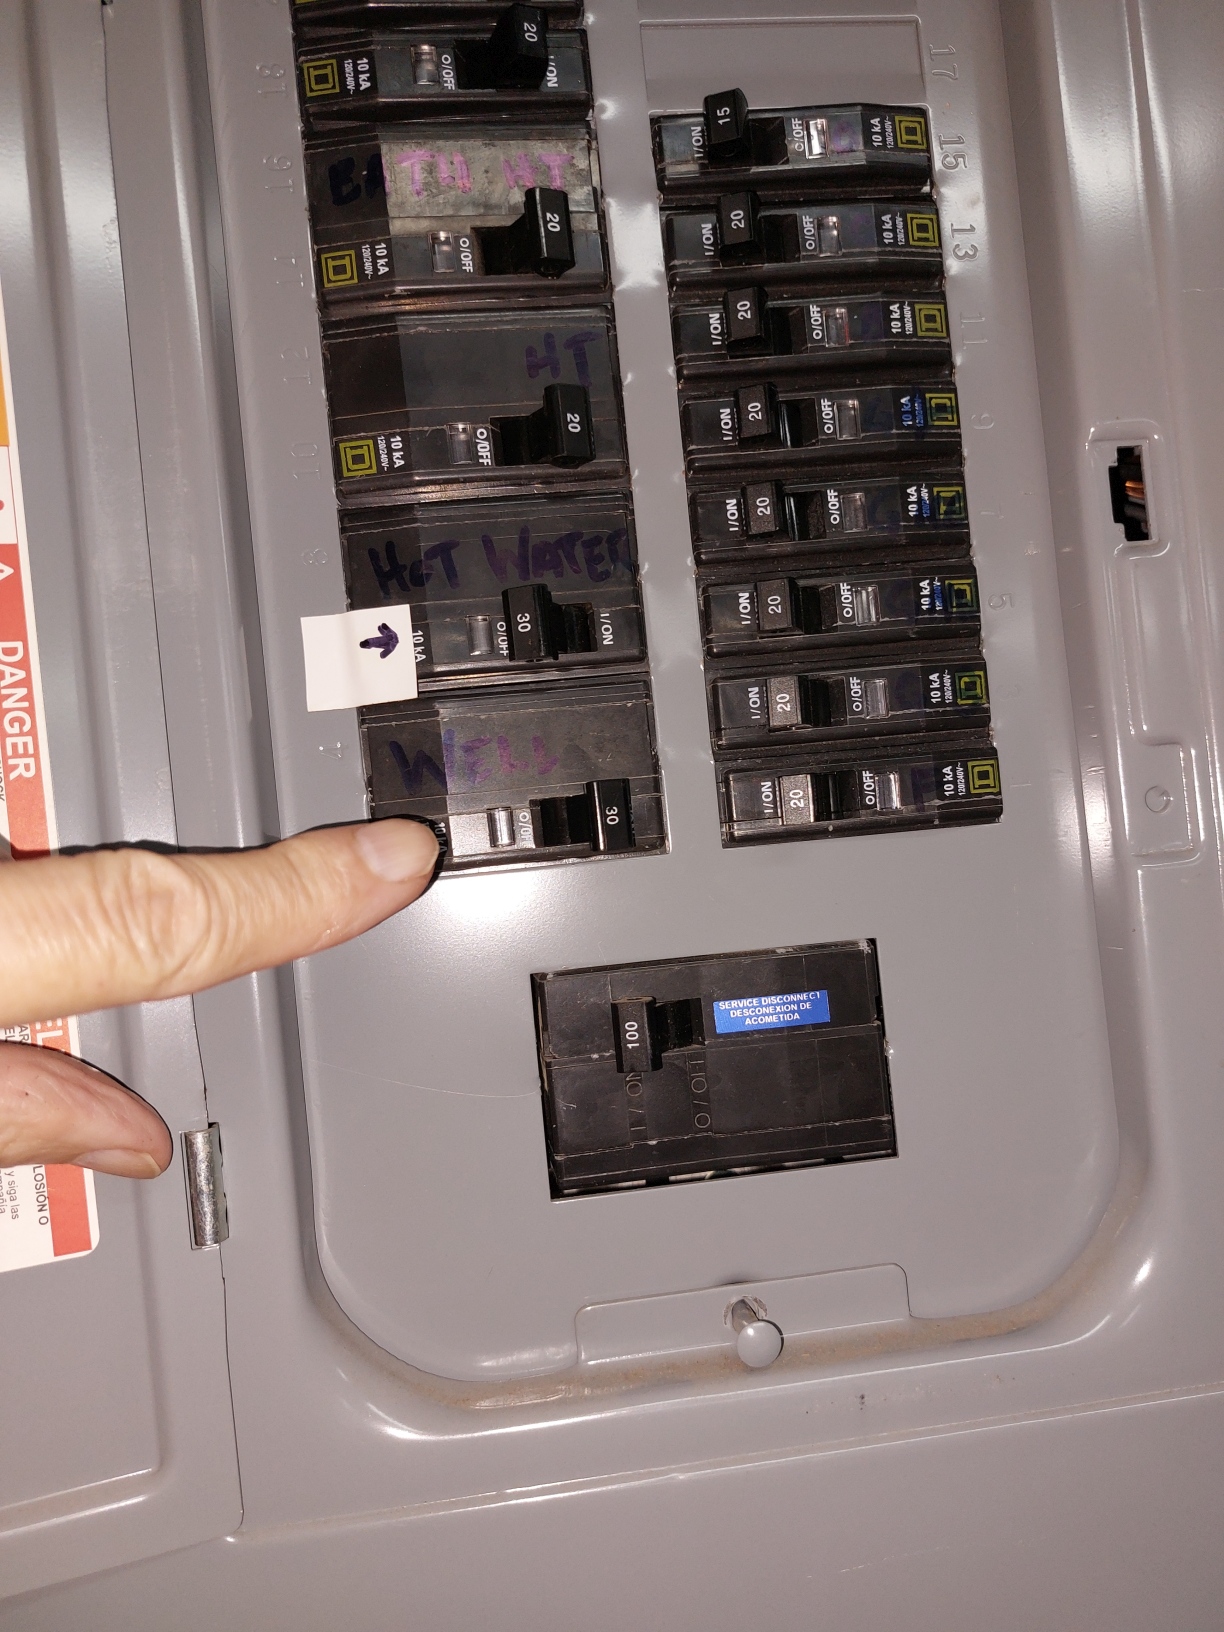 Although there's a breaker box on the outside of the pumphouse that controls
individual things inside the pumphouse, I believe the main pumphouse
circuit breaker is in the garage breaker box
labeled "WELL" - see finger to the right.
Winterizing the Pumphouse
The following procedure theoretically keeps the pumphouse water pipes from freezing
during the winter. It should be done before things start freezing ...
the
Maintenance Calendar
says to do it 15-October-ish.
-
 Get the "Pumphouse Winter" box off the shelf in the hot tub house.
-
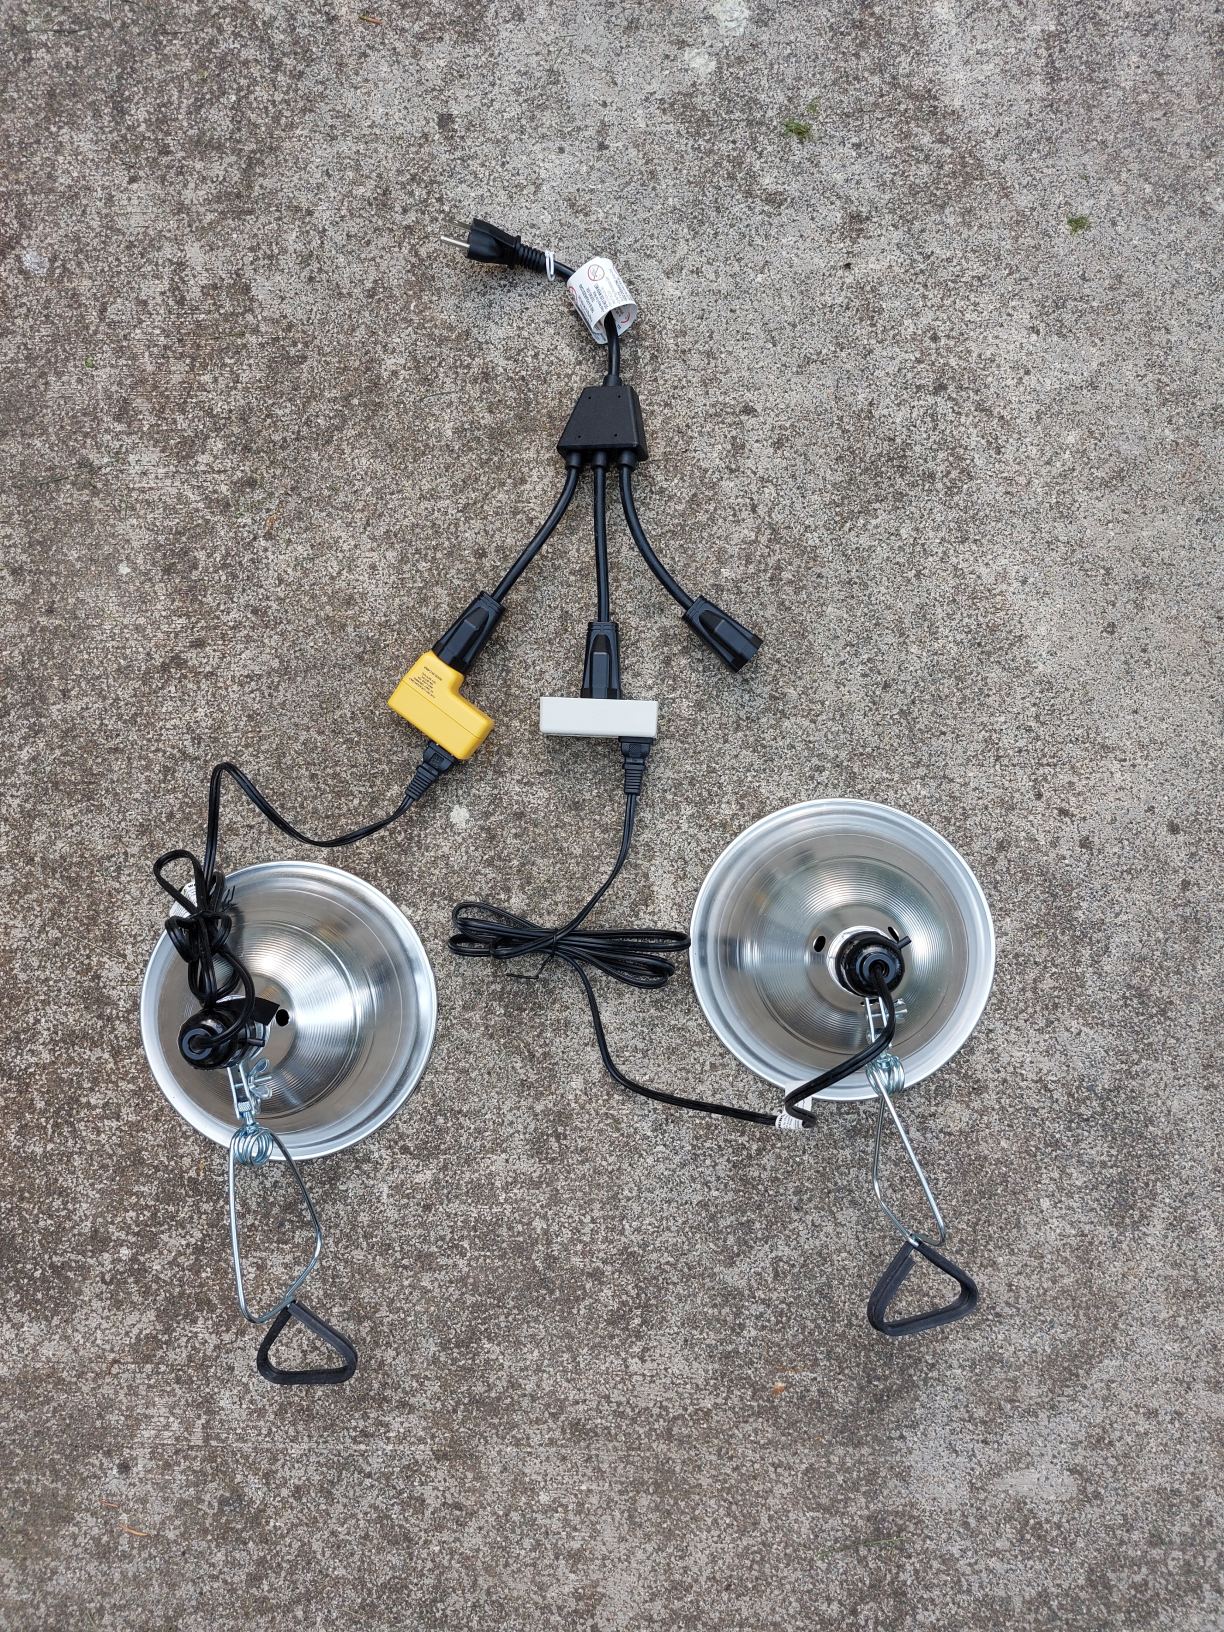 The Pumphouse Winter box should contain the following items:
- A cardboard box containing spare black "lightbulbs".
-
A tangle of cords and two silver metal clamp-on lights that, when untangled,
should look like the picture on the right.
The clamp-on lights have funny looking black "lightbulbs" in them. These bulbs produce heat but no light.
The lamps are plugged into "blocks" (one yellow, one white) that are thermostatically controlled outlets.
One of the outlets turns on when the temp drops below 38 (and turns off when the temp rises above 50);
the other turns on when the temp drops below 35 (and turns off when the temp rises above 45).
-
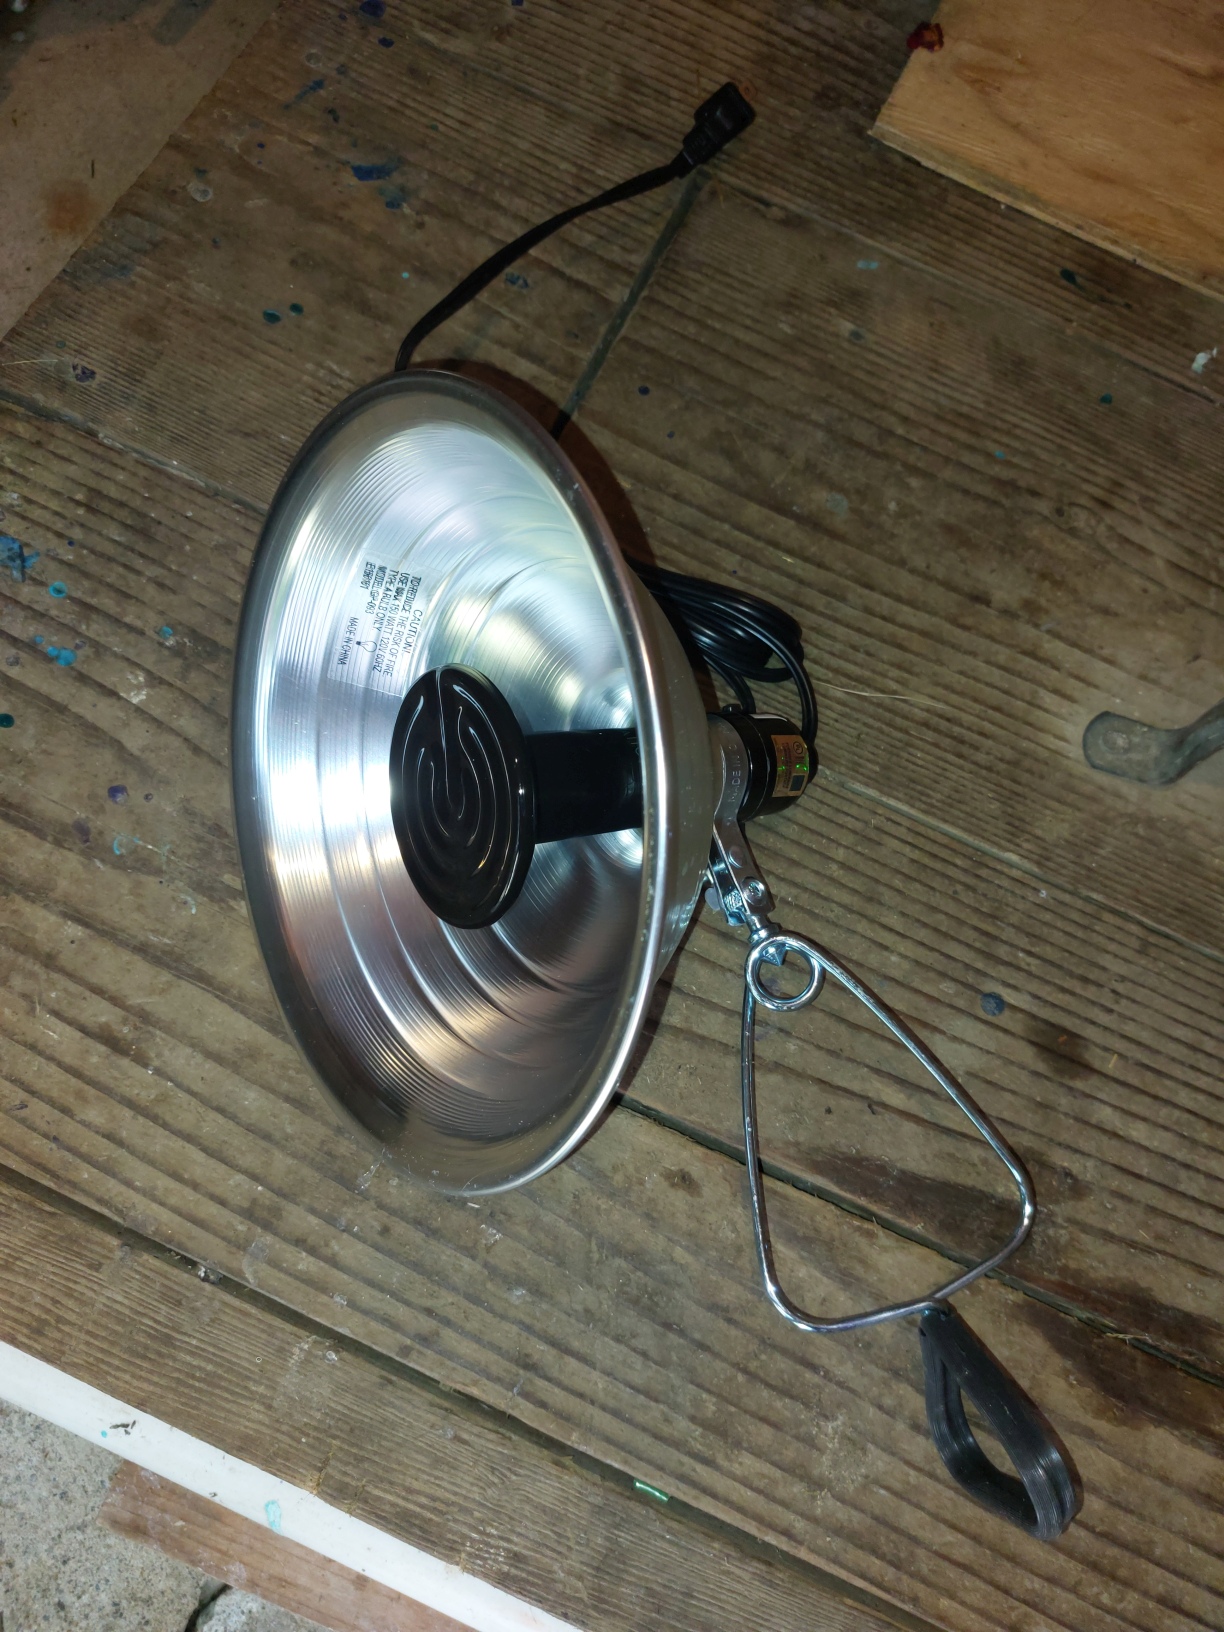 Unplug one of the clamp-on lights from its "block", take it into the house,
and plug it into a normal outlet.
Within 30 seconds you should be able to feel the black bulb heat up.
(Be careful, it gets very hot.)
As soon as you feel the
bulb heating up you can unplug the lamp. This verifies that a) the lamp
is turned on, and b) the black bulb still works. (The on/off switch on the lamp
has been taped "on".) If the lamp fails to heat, try replacing the black bulb. Troubleshoot as needed.
When heat verified, plug the lamp back into its "block" and repeat this step with the
second clamp-on lamp.
-
Put the "Pumphouse Winter" box, now containing just the spare lightbulbs, back on the shelf
in the hot tub house for the winter.
-
Take the assemblage of clamp-on lights, cords, and thermostatically controlled outlets
down to the pumphouse.
Open the pumphouse door (padlock combo is 0000) and step inside. Watch
out for the rat traps.
-
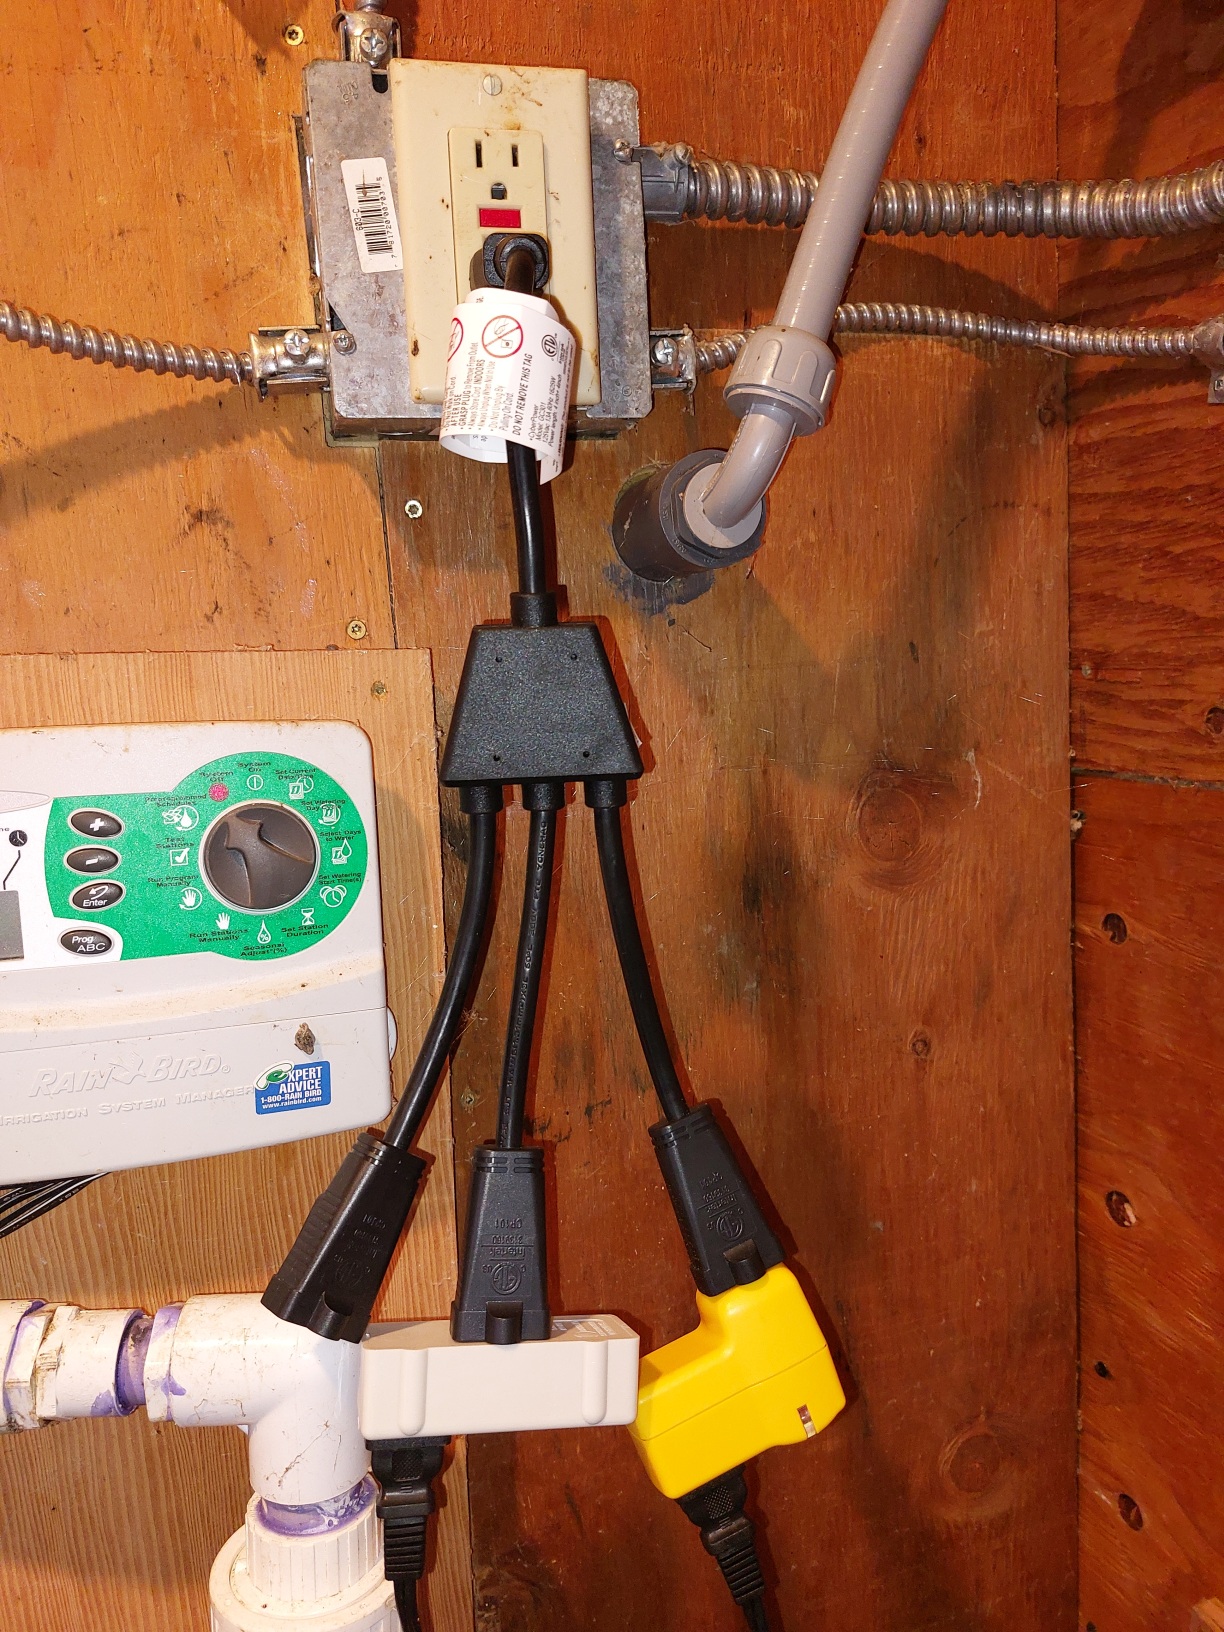 Plug the "top" of the assemblage into the outlet on the wall - as shown in the pic
to the right.
-
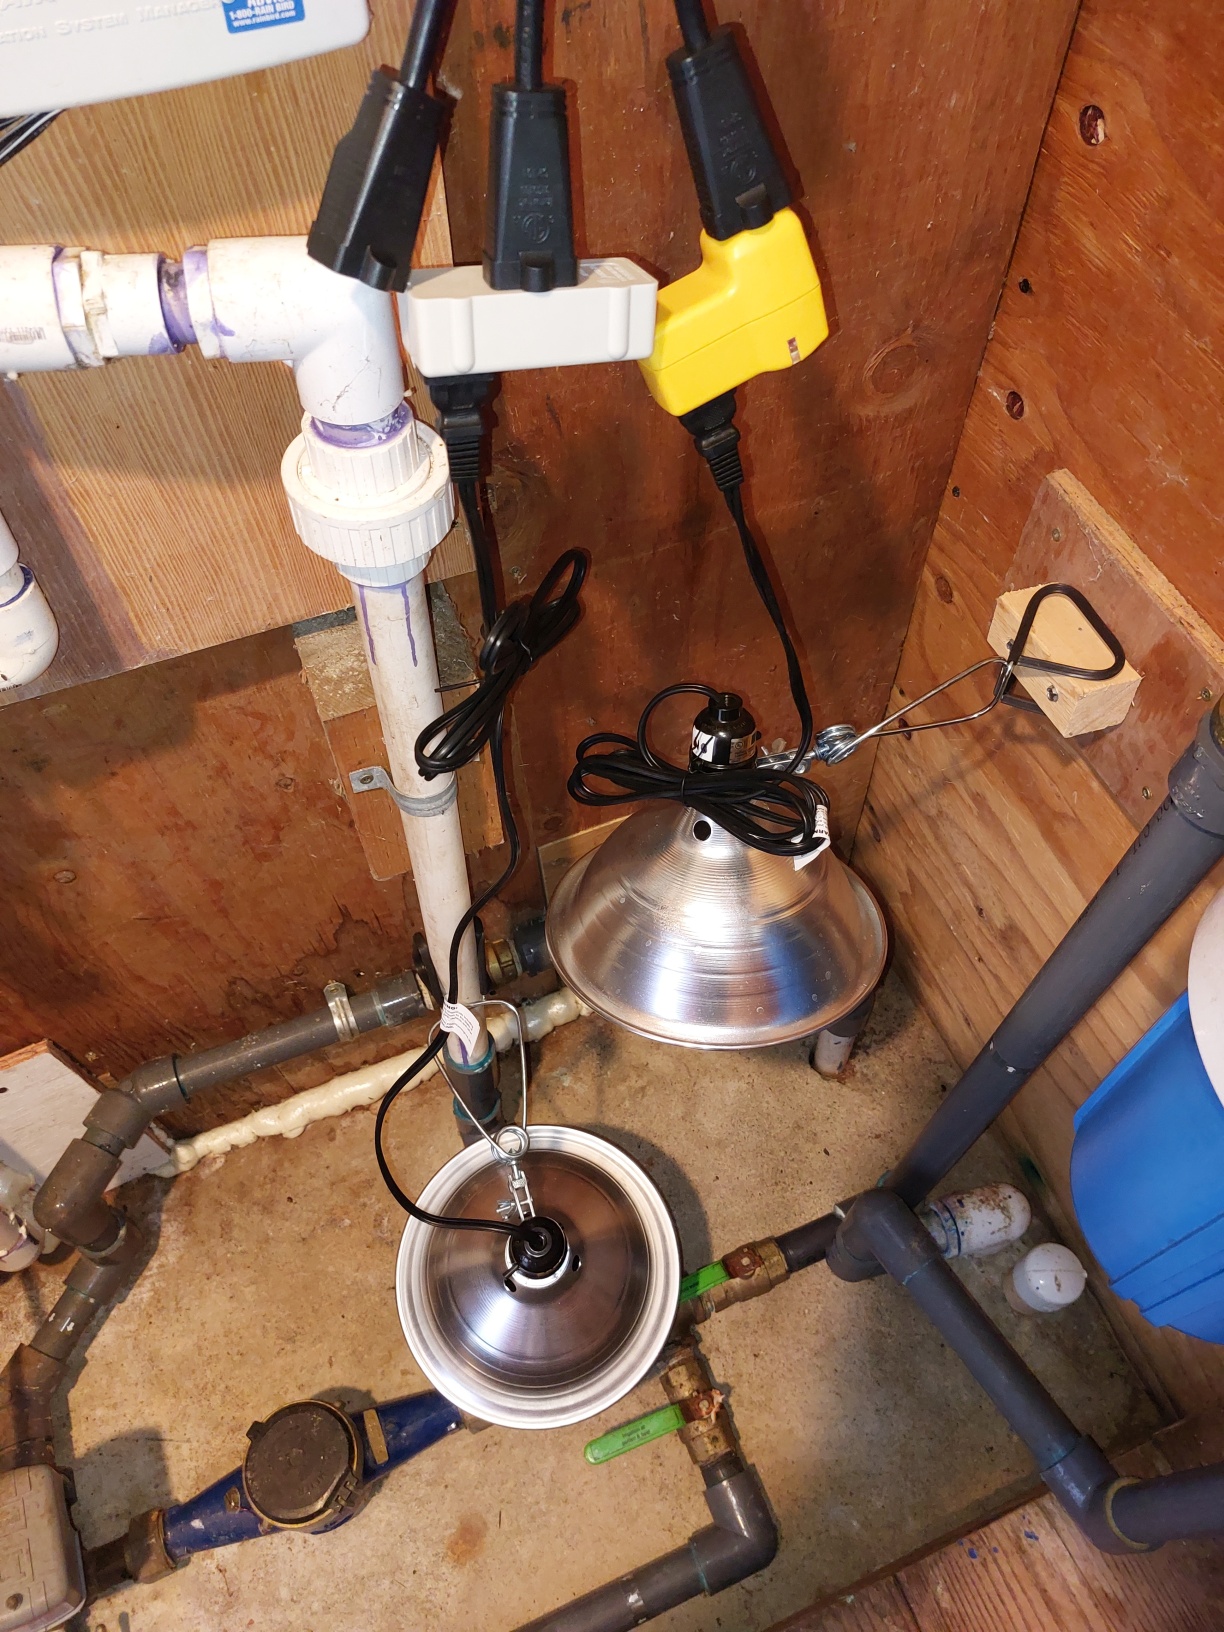 Clamp one of the lamps on the block of wood on the wall beside the blue filter assembly.
Clamp the other lamp onto a vertical white plastic pipe. Both lamps should be pointing
"down" towards the water pipes running along the floor. They should look something
like the pic to the right.
-
Close and lock the pumphouse door.
-
Enter today's date and a note saying you winterized the pumphouse
in the pumphouse page of the maintenance journal - which sits on the shelf
above the desktop computer.
Un-Winterizing the Pumphouse
Sometime after the last freeze, unplug the above assemblage from the wall,
unclamp the two clamp-on lamps, and put the whole thing
back into the "Pumphouse Winter" box in the hot tub house.
The
Maintenance Calendar
says to do it 1-May-ish.
Enter today's date and a note saying you un-winterized the pumphouse
in the pumphouse page of the maintenance journal - which sits on the shelf
above the desktop computer.
Changing the Pumphouse Filter
-
Let people know the water will be off for a few minutes.
-
 Get the open box of pumphouse filters off the shelf in the hot tub house.
In addition to filters, the box contains some tools, lube, and spare large black O-rings.
-
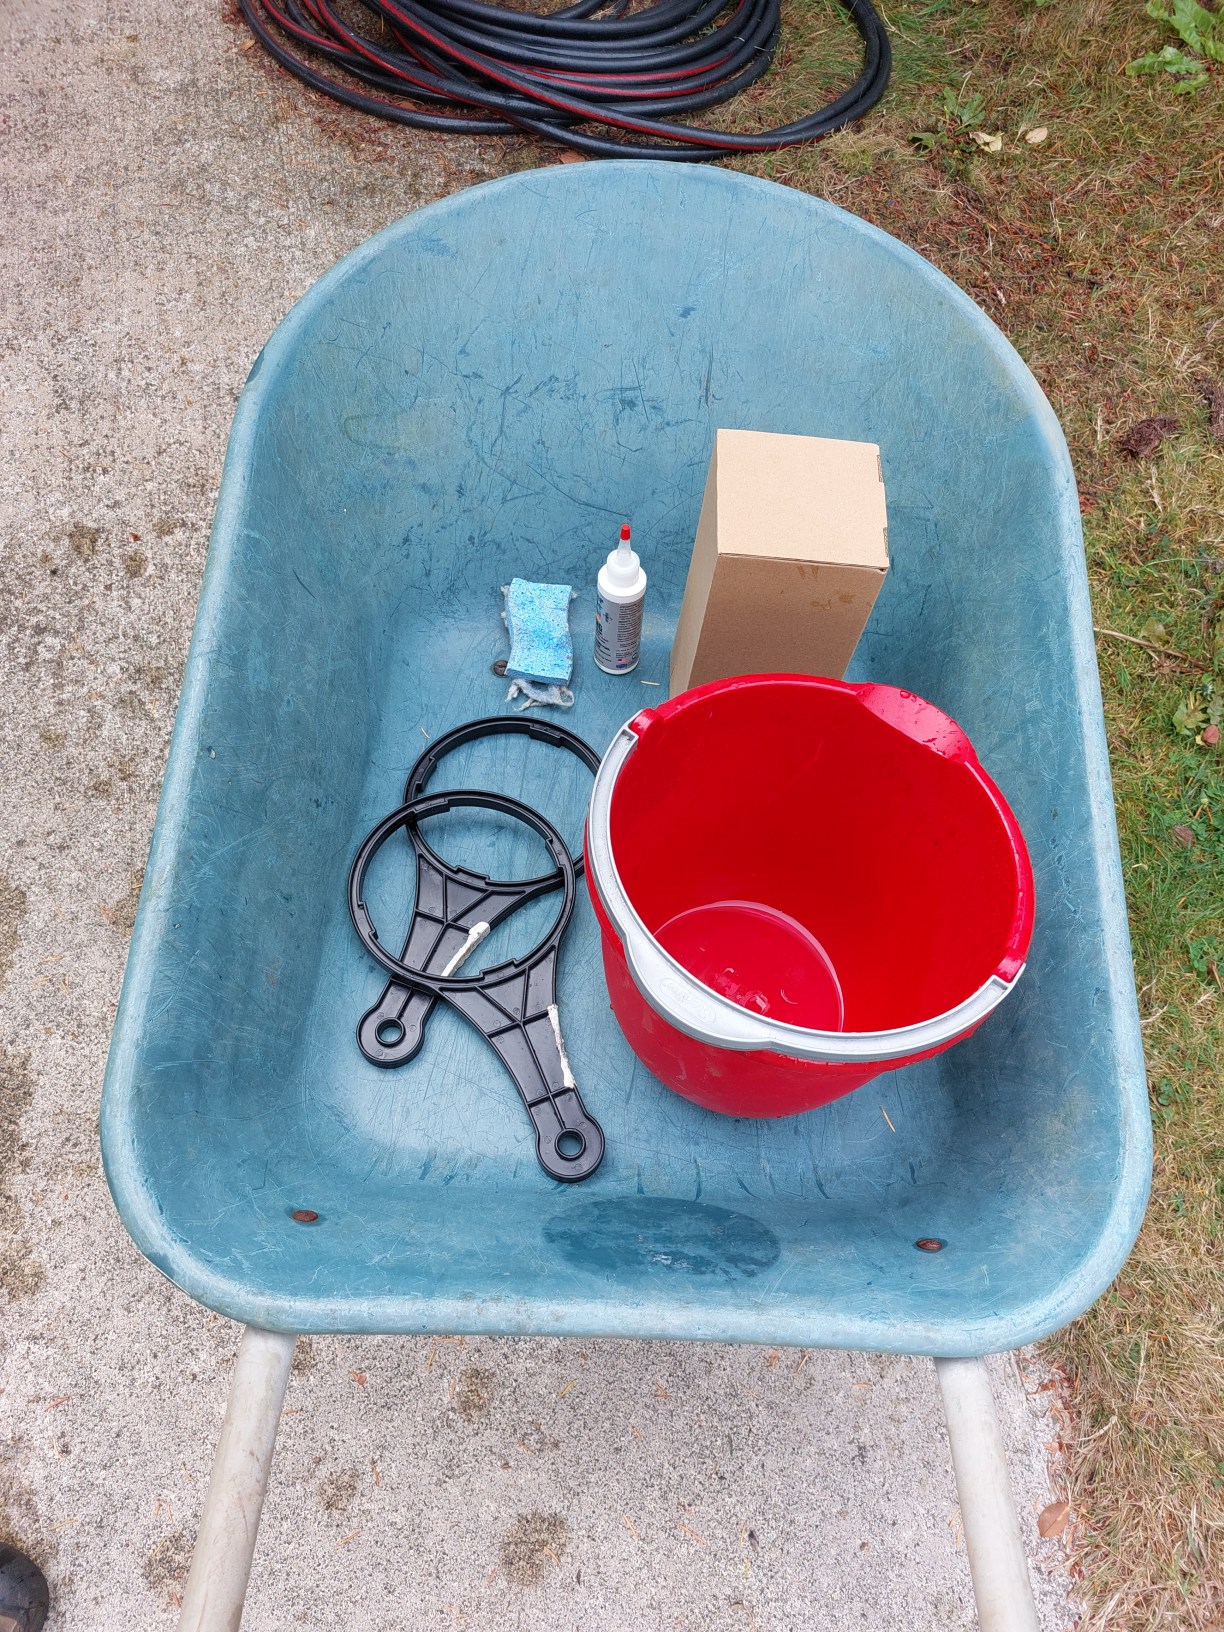 From the open box gather a new filter, the 2 large
plastic wrenches, the sponge, the
little bottle of lube, and head down to the pumphouse. (Bucket optional.)
Open the pumphouse door (padlock combo is 0000) and step inside. Watch
out for the rat traps.
-
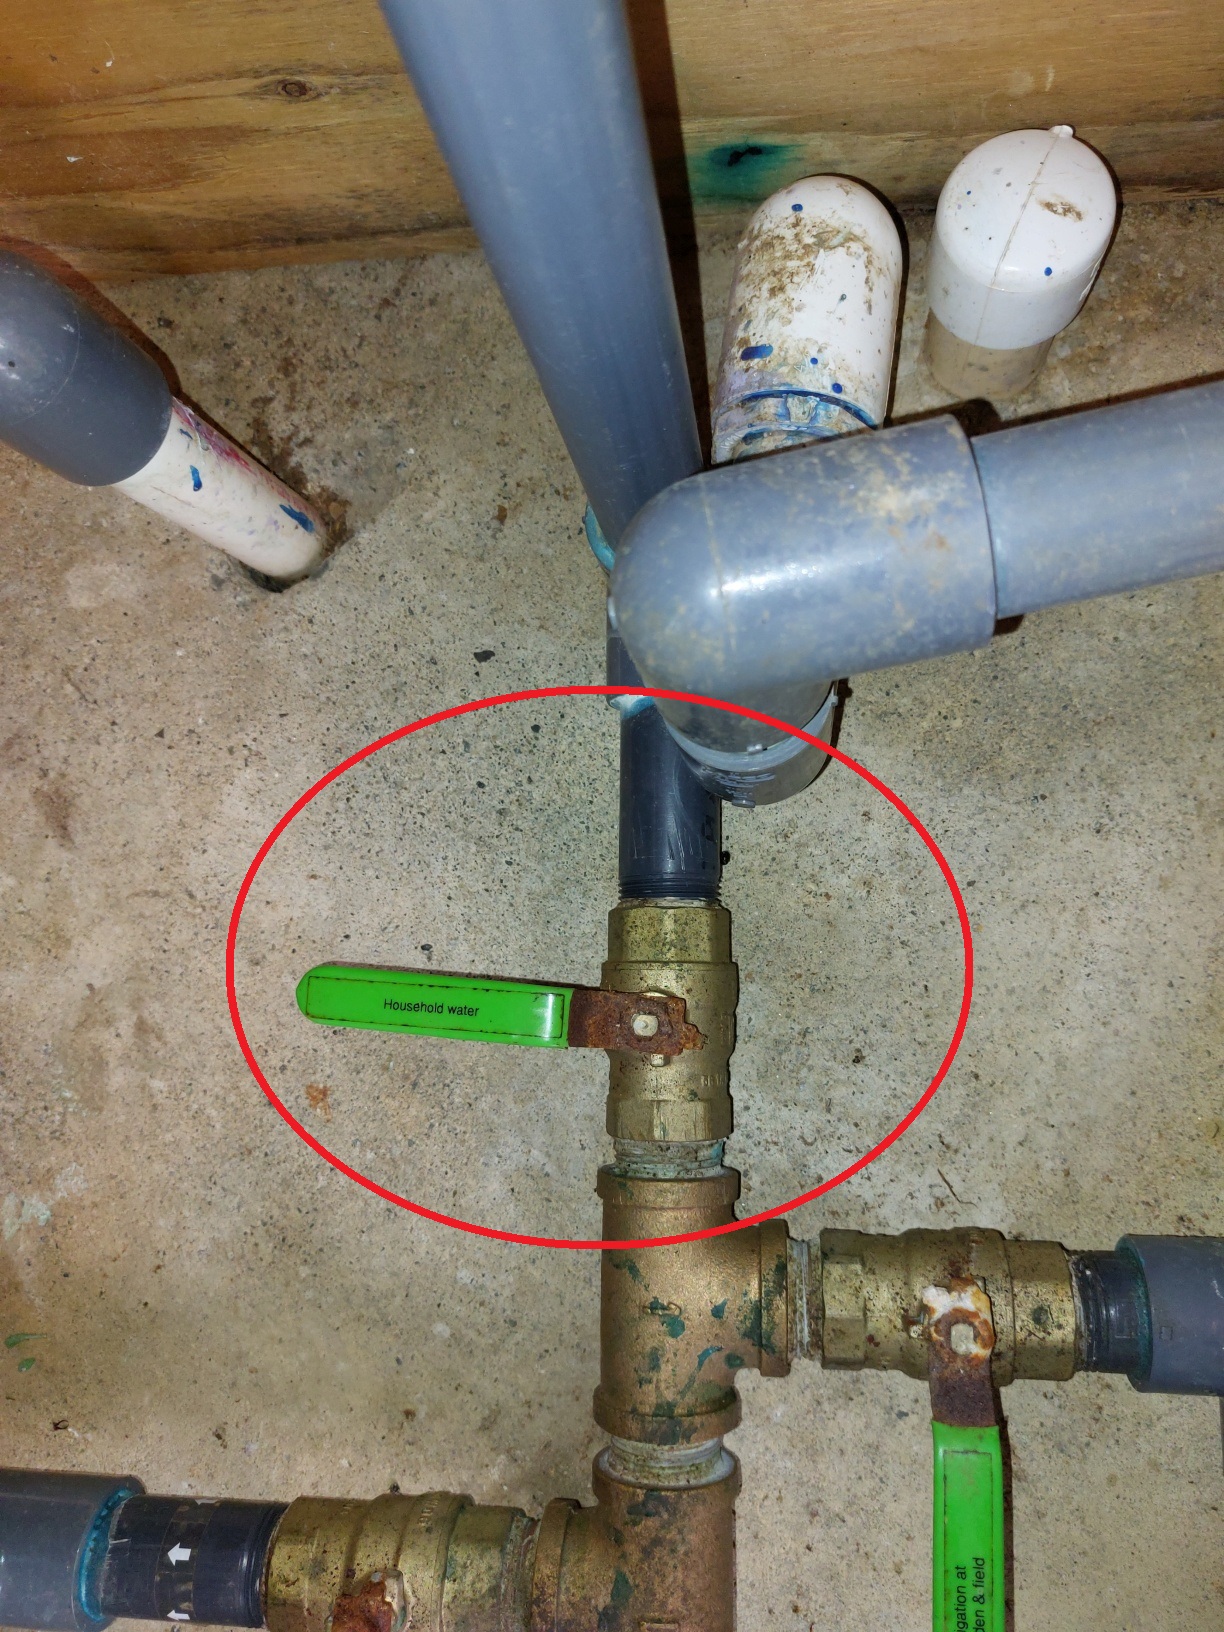 Turn the main house water off using the green handle labeled "Household water".
The pic to the right shows it "off".
-
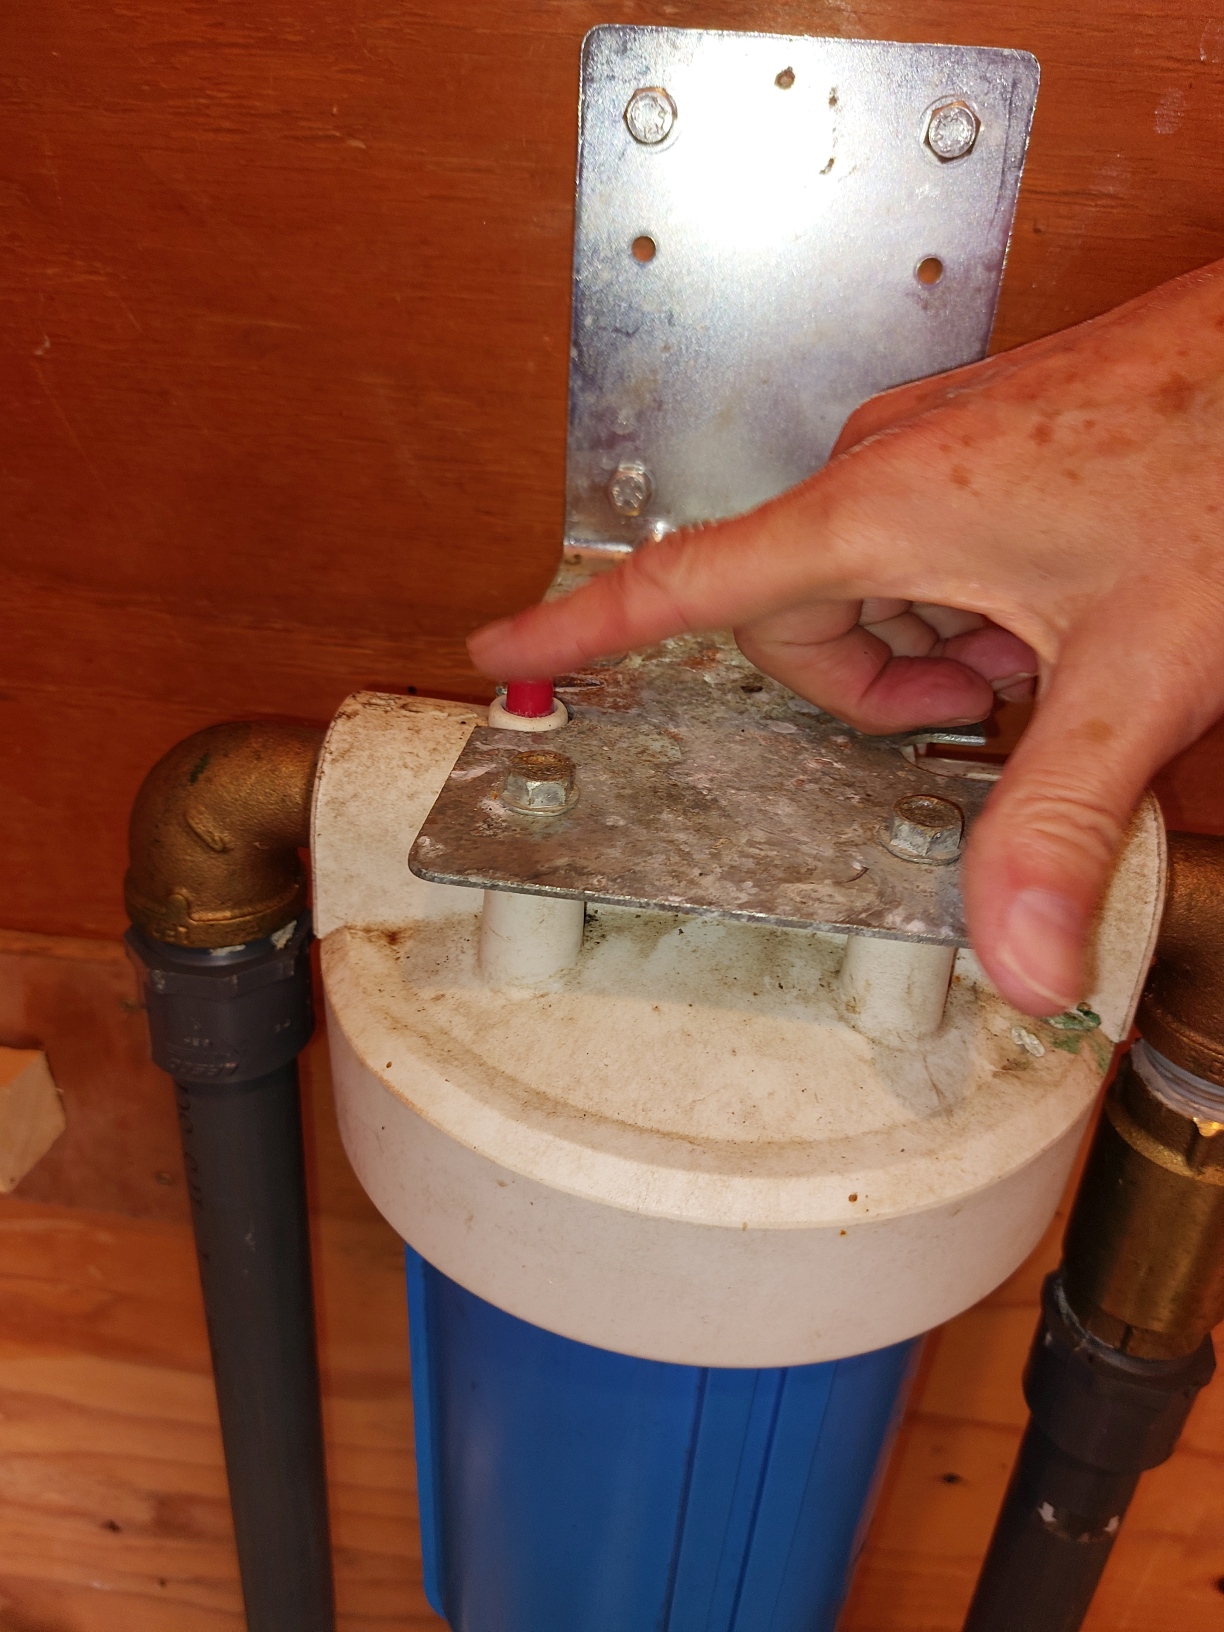 Push down on the red button on top of the blue filter housing to
release the water pressure.
-
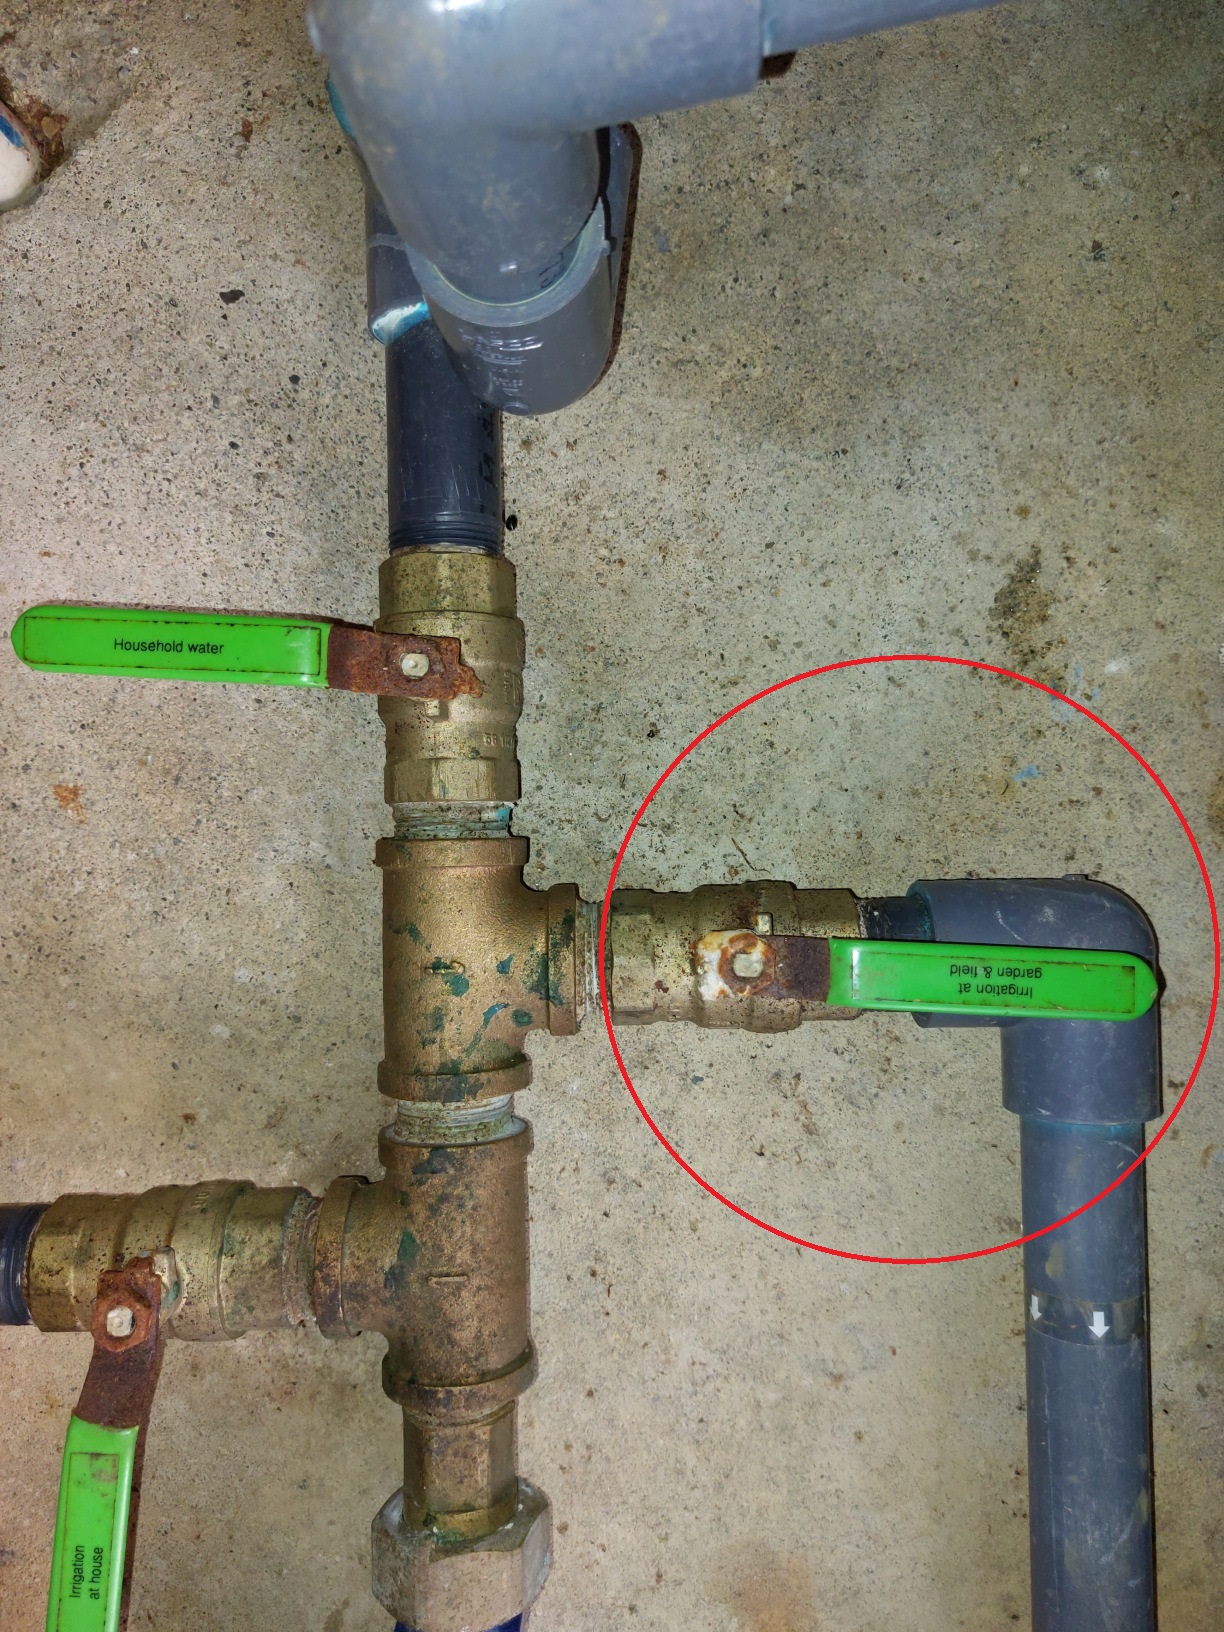 Turn the standpipe water on using the green handle labeled "Irrigation at garden & field".
(You're going to use the standpipe
outside the pumphouse to wash the blue filter housing.)
The pic to the right shows it "on".
-
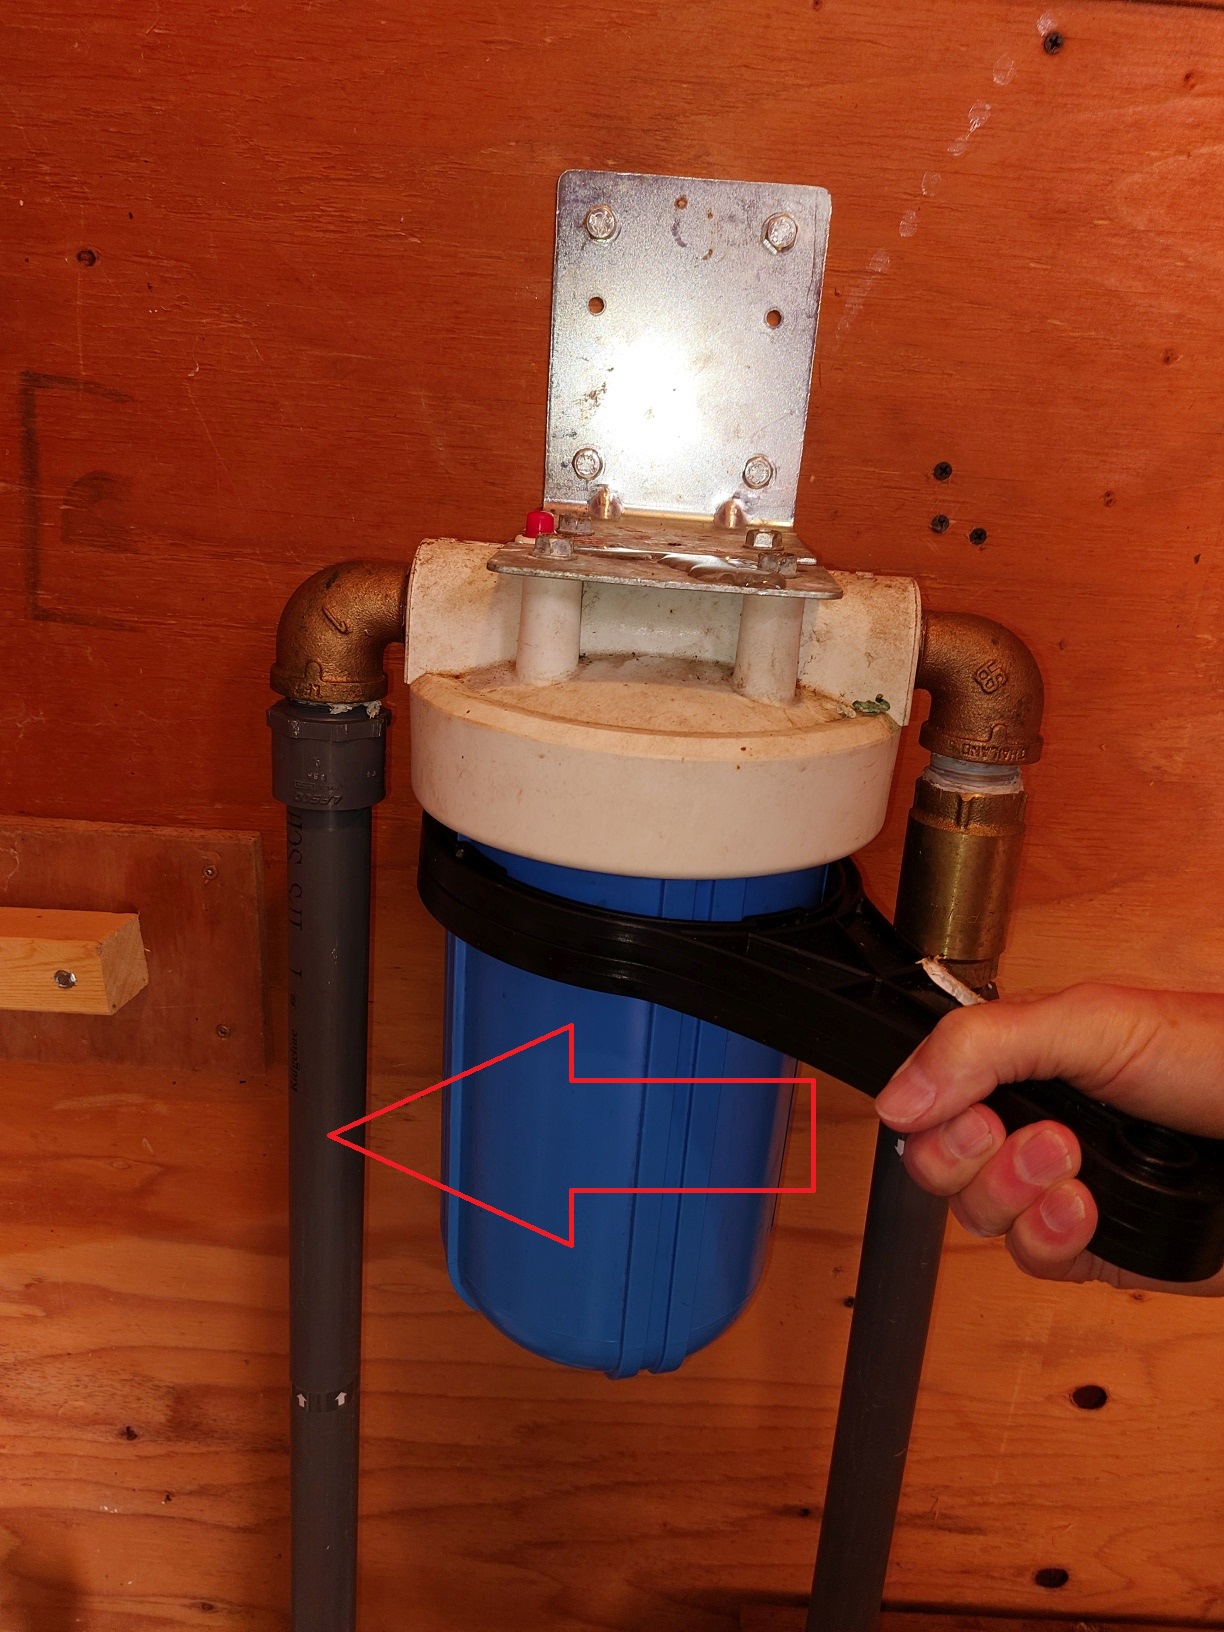 Slide both plastic wrenches up the right side of the blue filter
housing from the bottom, then push the handles hard to the left.
Repeat until it turns easily. (You are unscrewing the blue filter
housing from the white top.)
-
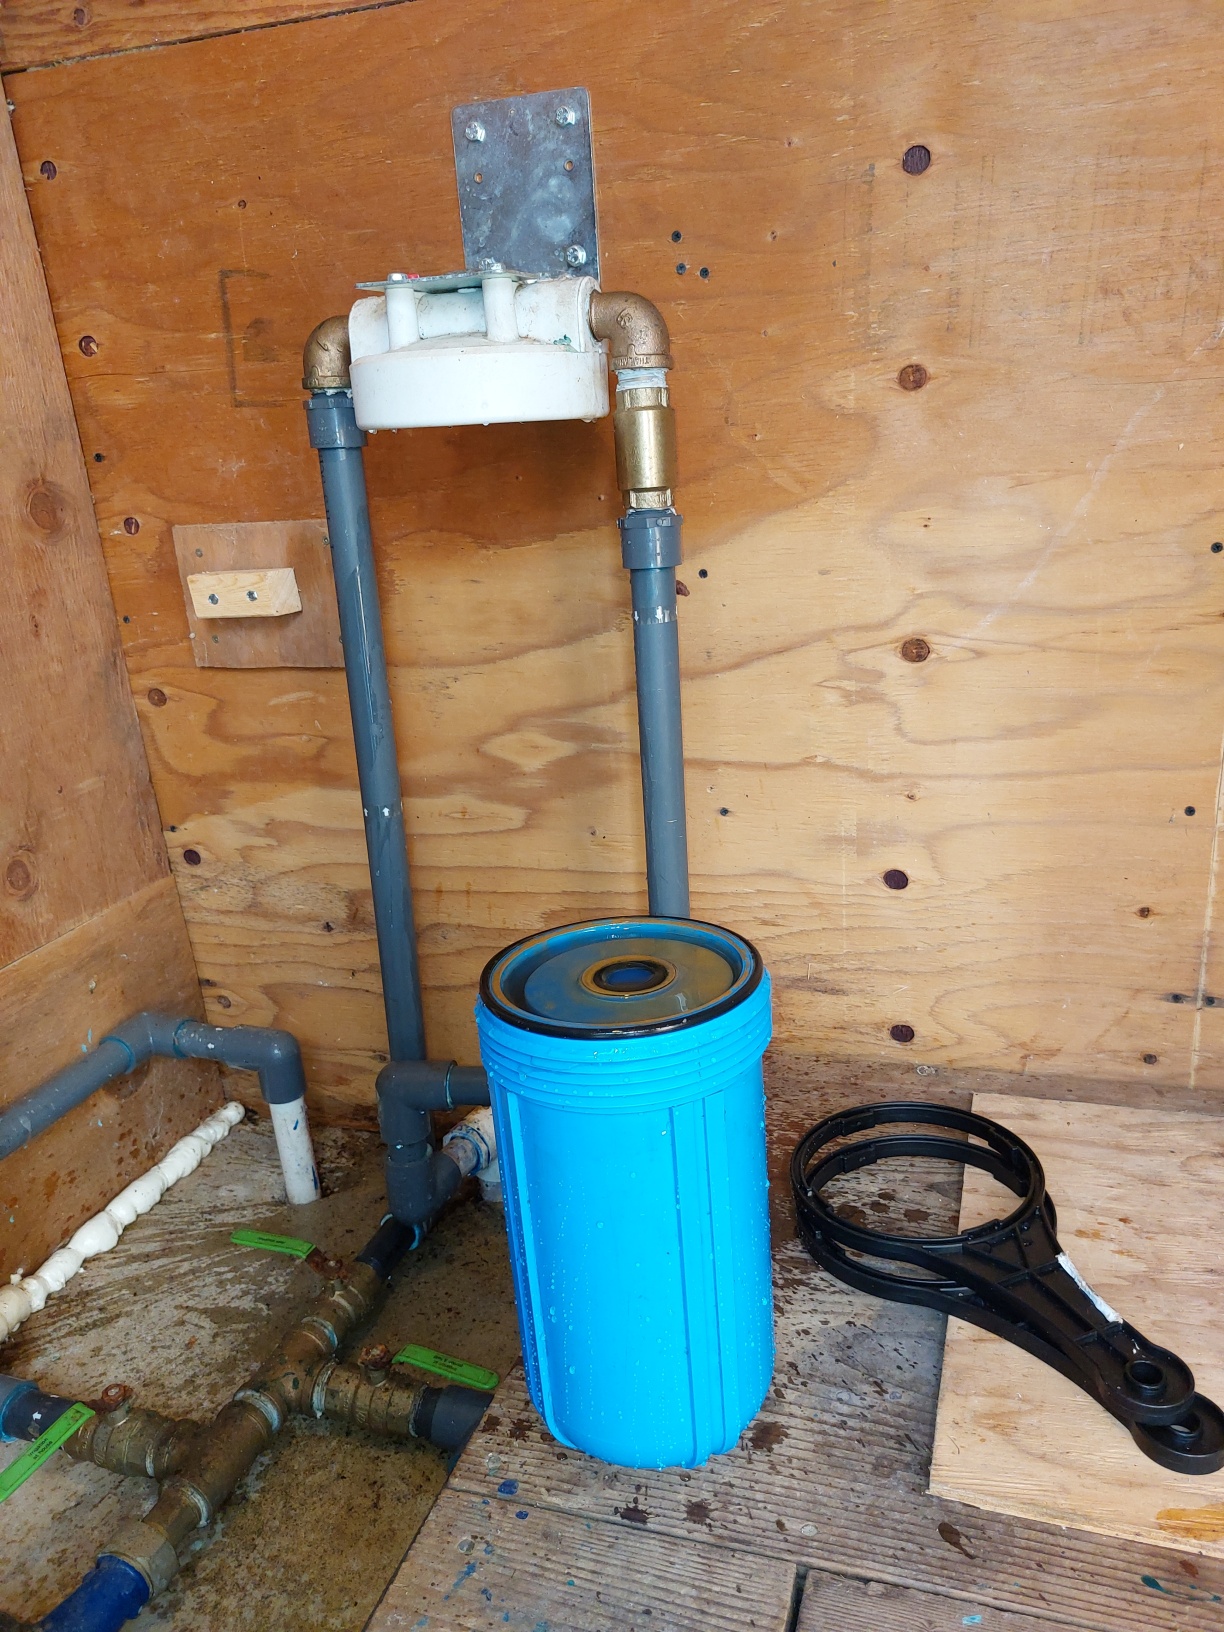 Once the blue filter housing turns easily,
remove the plastic wrenches, then finish unscrewing the blue housing
by hand, being careful not to drop it when it detaches. Water will
spill everywhere - this part is messy.
-
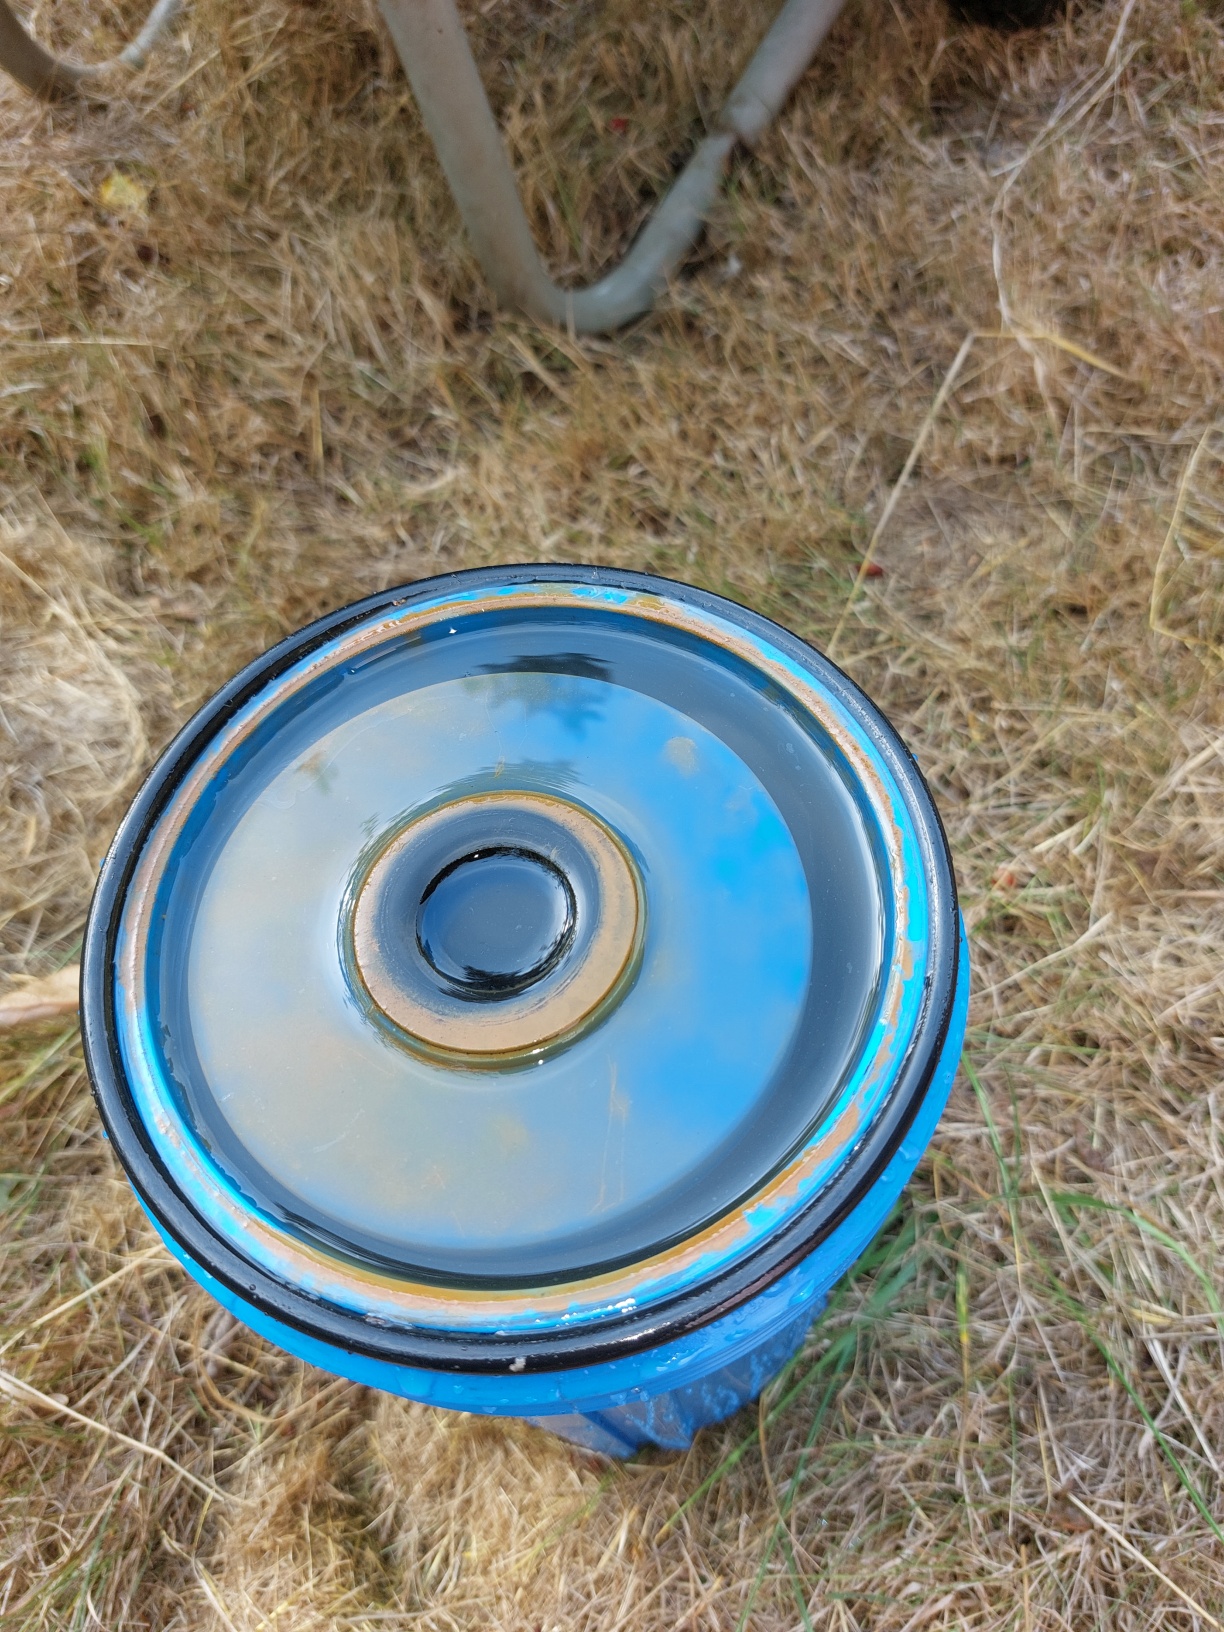 Carry the blue housing outside and remove the large black O-ring and
the old filter. (If the O-ring is damaged in any way, go back to the
hot tub house and get a new O-ring from the box of pumphouse filters.)
-
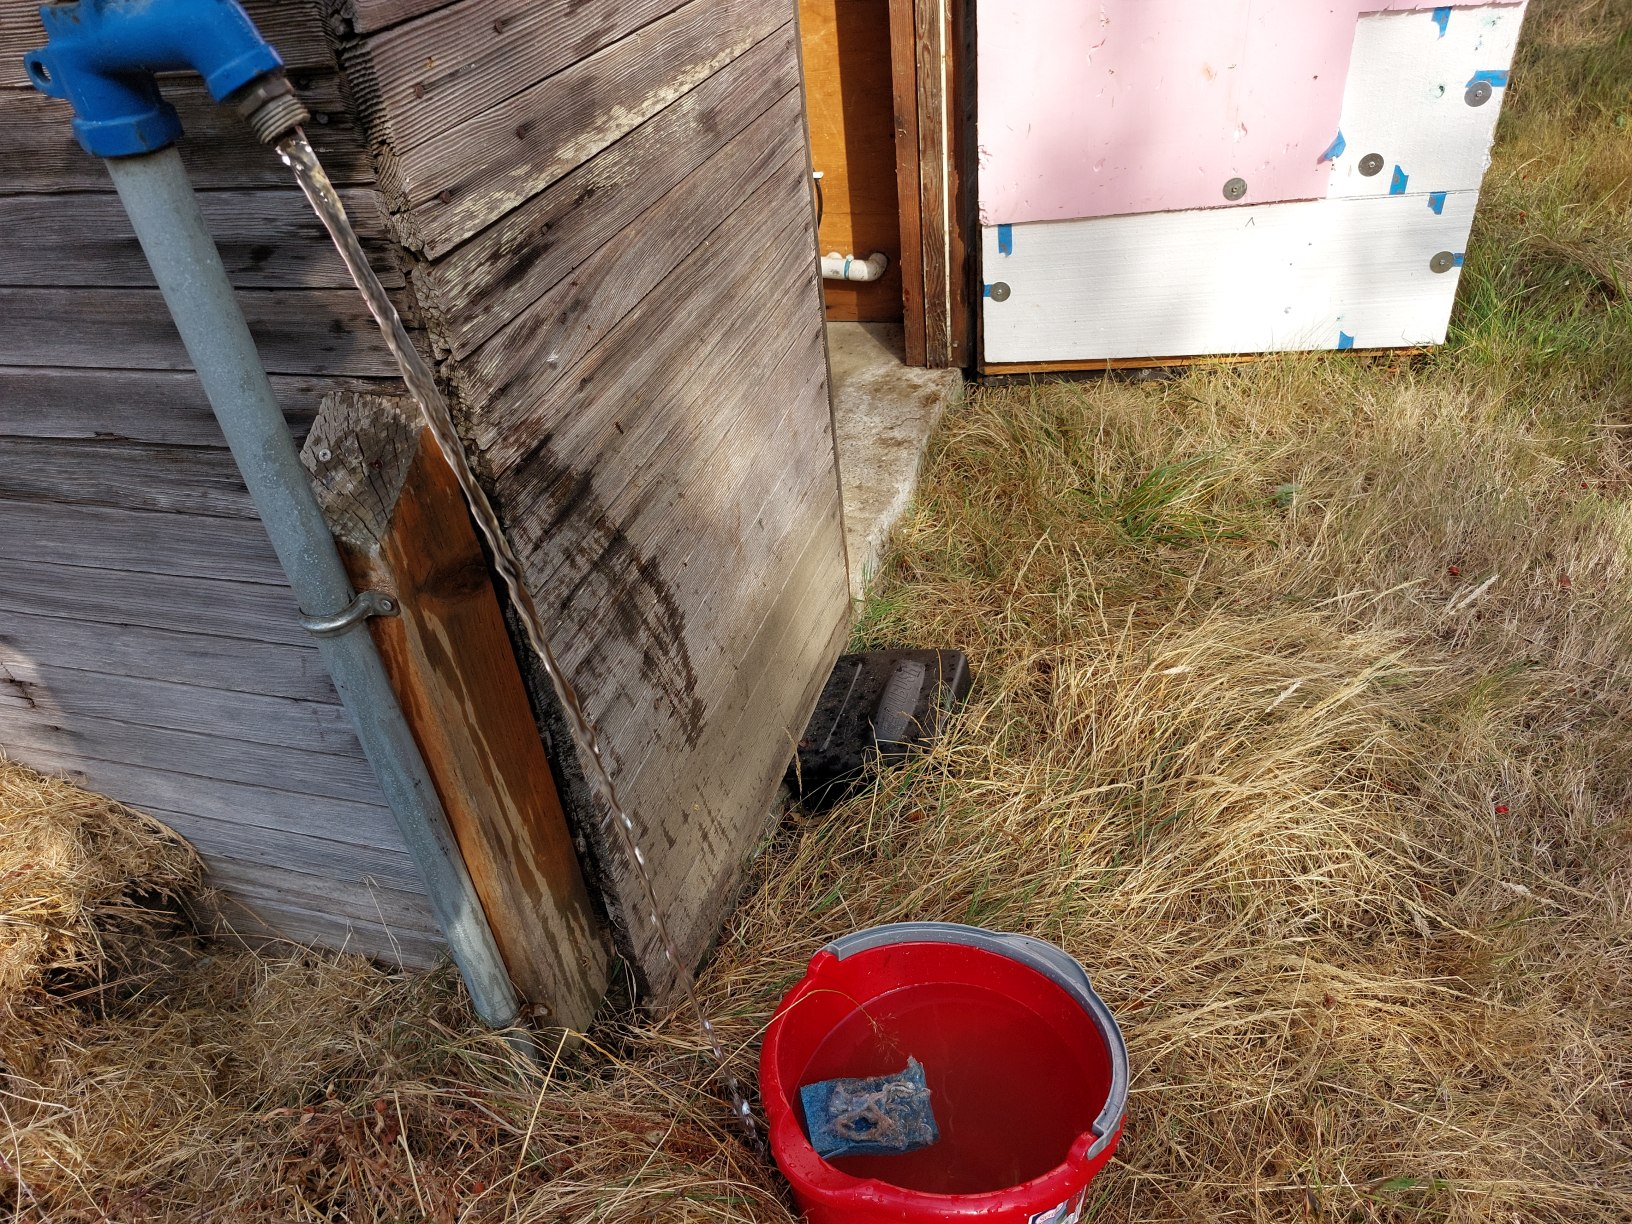 Wash the empty blue housing out using water from the standpipe and the sponge.
-
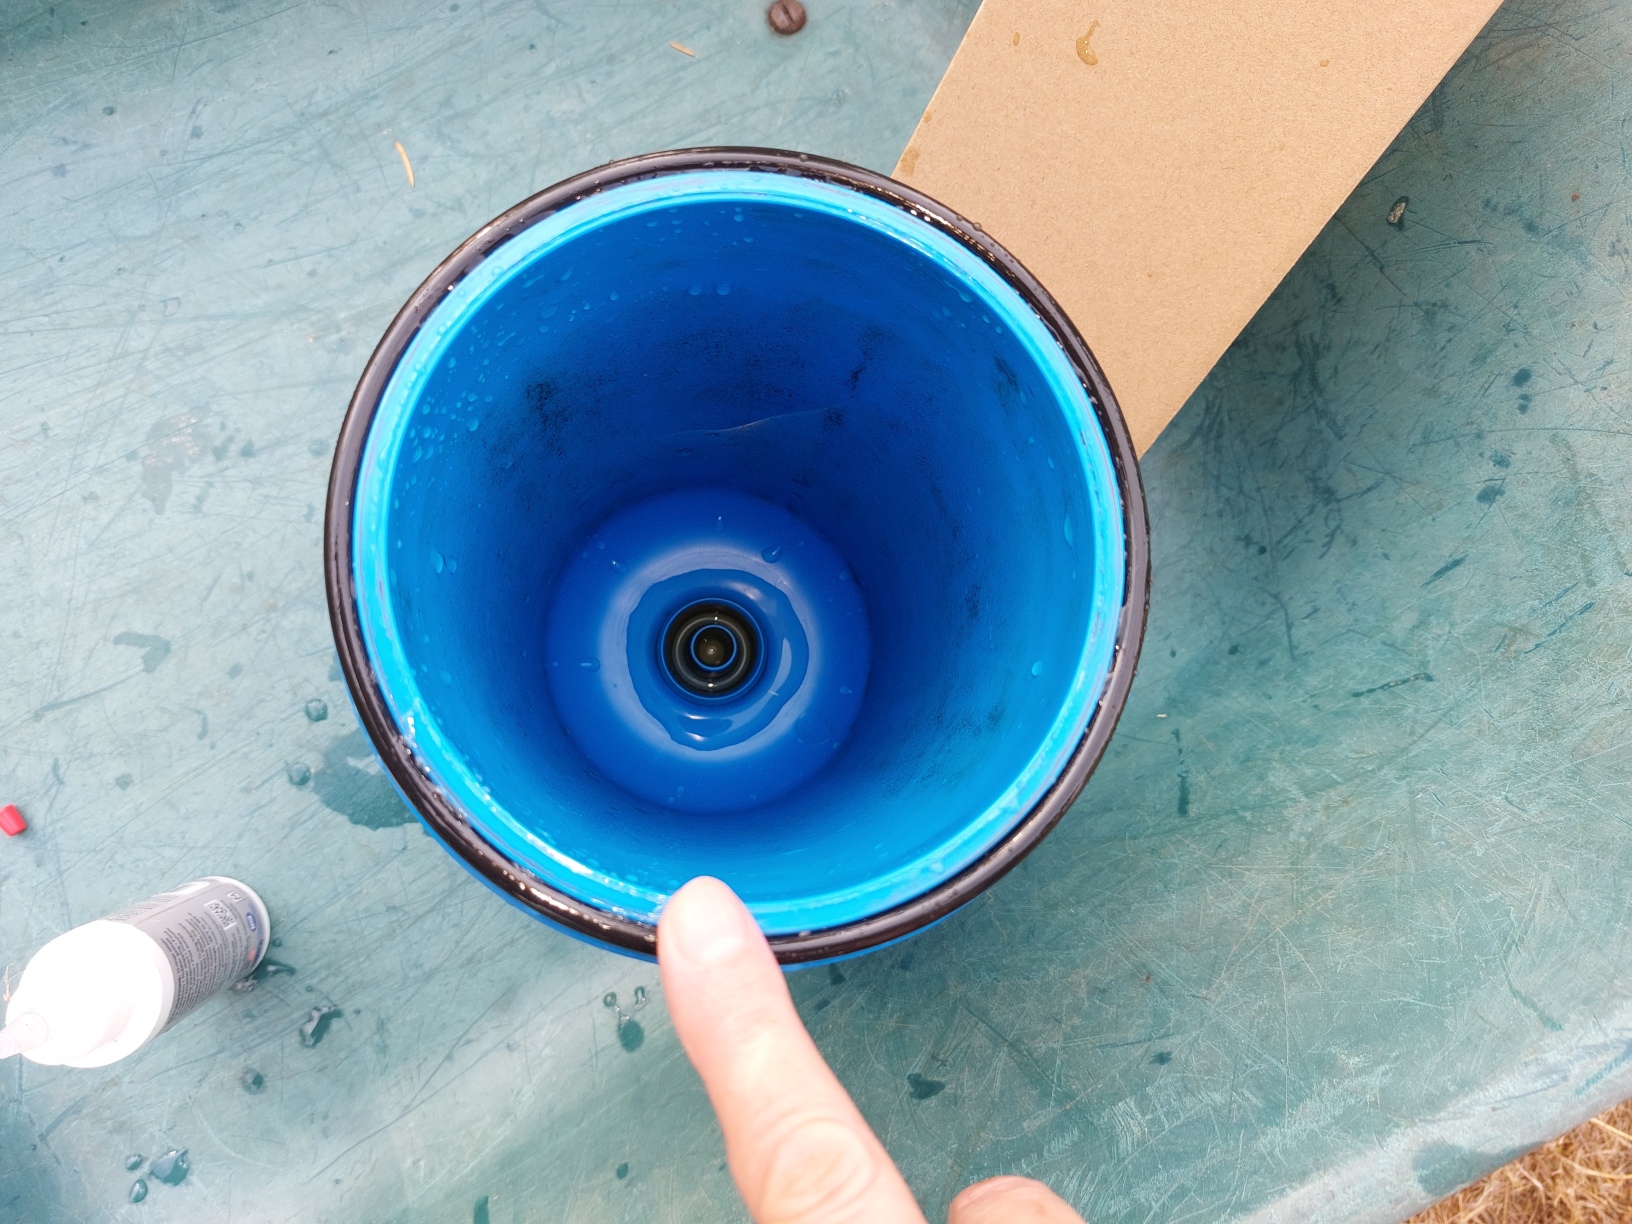 Put some of the silicon lube from the small bottle onto your fingers and
lube the O-ring and the top lip of the blue container.
-
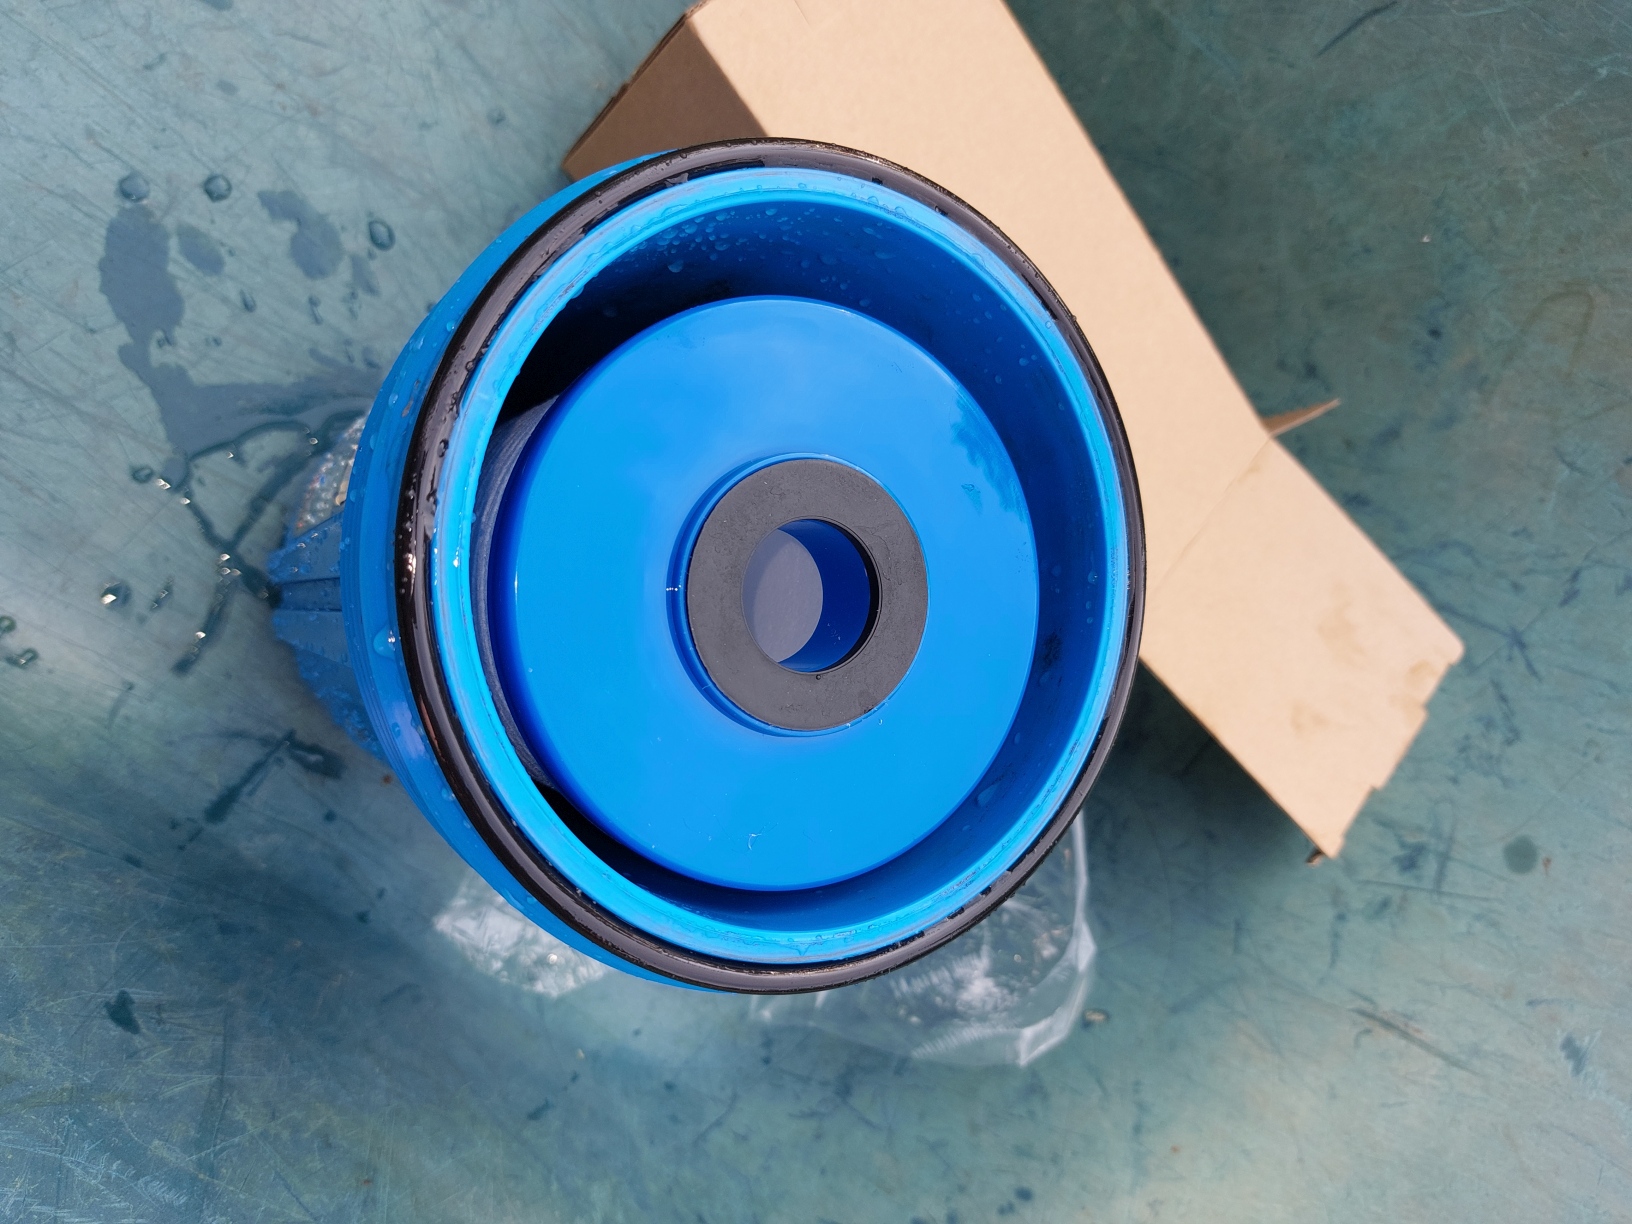 Place the new filter into the blue container. (Both ends of the filter are
identical, so it doesn't matter which end is up.)
-
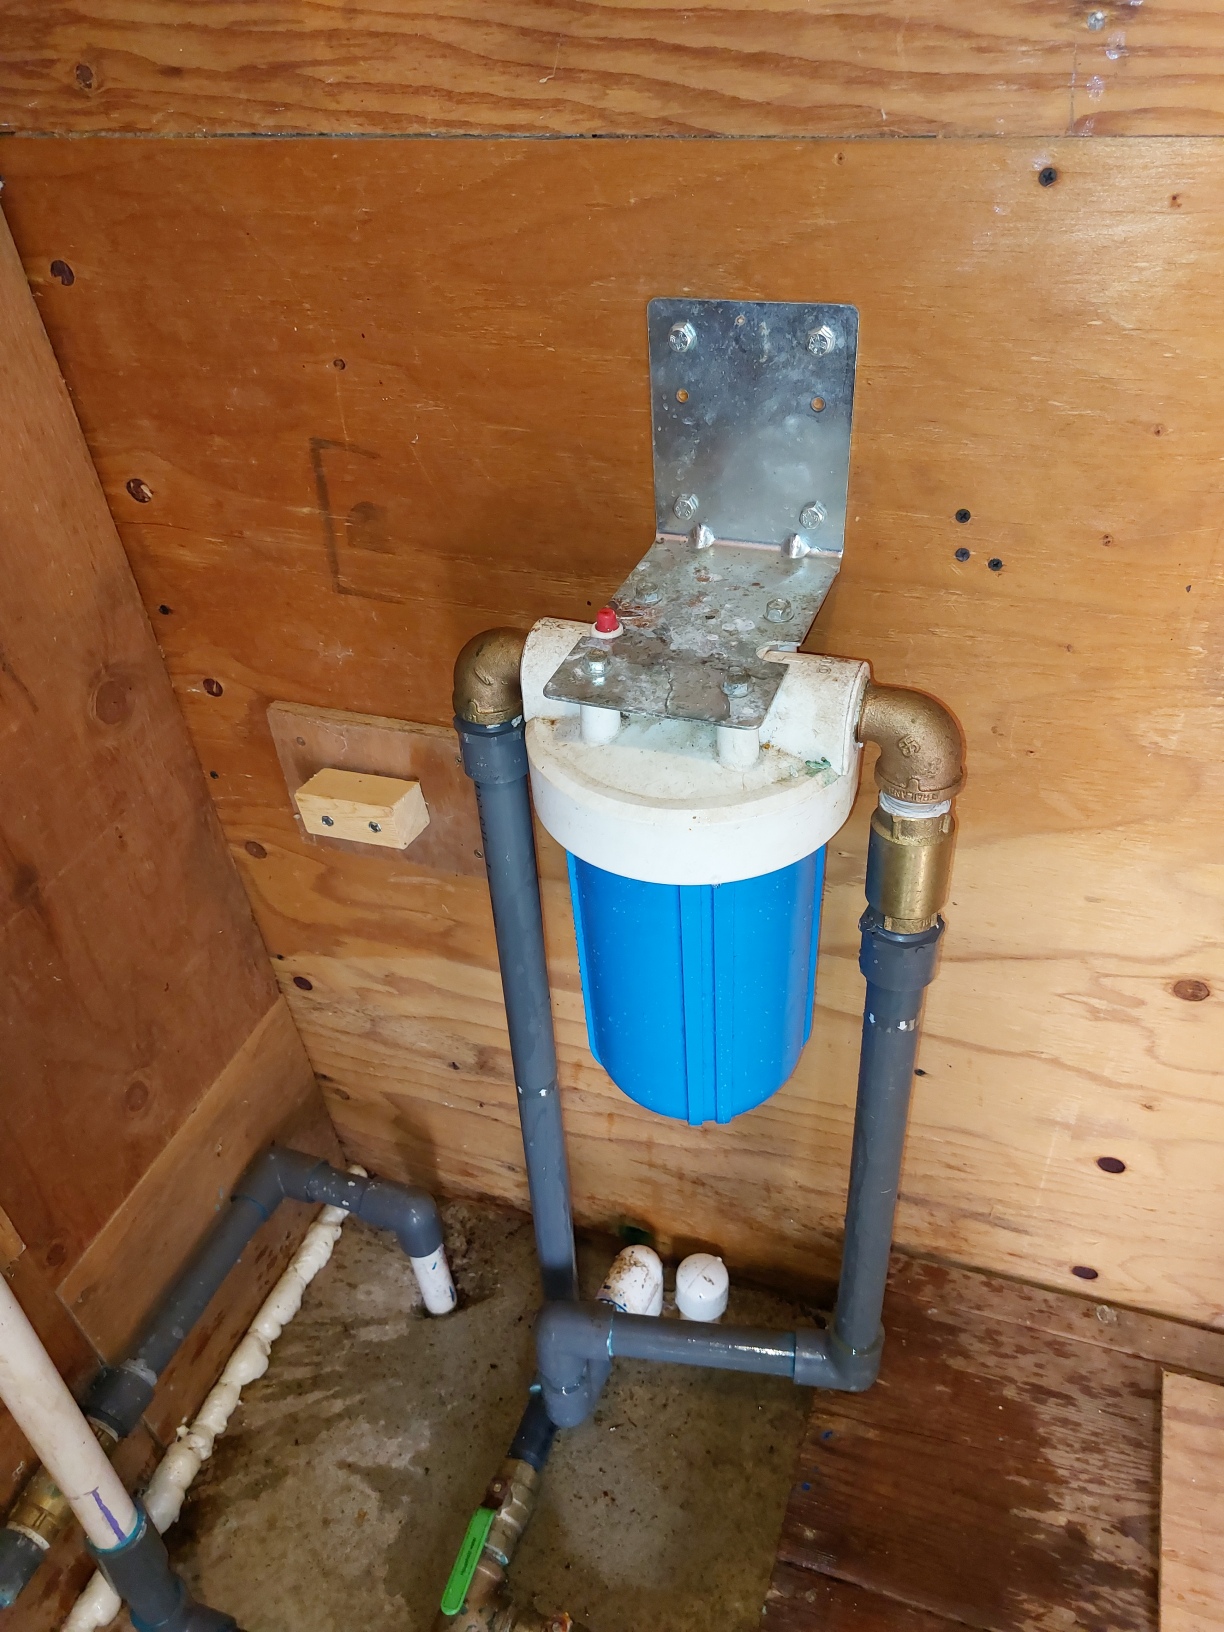 Screw the blue container back into the white top part by hand,
and then tighten gently but securely using the black plastic wrenches.
-
 Using the green handles that you messed with above,
turn the main house water back on, and the standpipe back off.
The pic to the right shows the house water "on" and the standpipe "off".
-
Close and lock the pumphouse door.
-
 Put the sponge, lube, and plastic wrenches back in the open box
of pumphouse filters, and put the box back on the shelf in the hot tub house.
-
Enter today's date and a note saying the filter was changed
in the pumphouse page of the maintenance journal - which sits on the shelf
above the desktop computer.
-
The above process spills a lot of water on the floor of the pumphouse,
so it's hard to tell right away if the filter housing is leaking around
the O-ring.
If you can, check the pumphouse after the spilled water dries
(say, the next day) to make sure the filter housing is not leaking.
 Just to the left inside the door is a large pressurized water tank.
On it is a warning to watch out for the two "set" rat traps on the
floor among the pipes. (I don't want to put rat poison in the
pumphouse.) Watch out for those as you fiddle around.


 Directly ahead of you as you stand in the doorway is the large wooden well cover.
Both the wooden lid with the handle and the loose piece of plywood behind it
open onto a very deep well. Go slow and careful in there.
 On the left side of the opposite wall is a bright blue filter housing
containing the primary filter for the house water. The filter
needs to be changed on a regular basis - see
 The pipe exiting the bottom of the water tank passes thru a meter and
then branches into three pipes: one to the left, one straight ahead,
and one to the right. Each of the three branches has its own labeled
green-handled shutoff valve - as seen in the pic with this paragraph. The branch that
goes straight leads to the bright blue filter mentioned above, i.e., that's the main
line that goes to the house. Its green-handled shutoff valve is labeled
"Household water".
Notice in the pic that its handle is "in line" with the pipe - i.e.
the valve is open. To shut the house water off, turn the handle a quarter turn
so that it's at a right angle to the pipe.
(Notice also in the pic that the other two shutoff valves are
closed because they are at right angles to their respective pipes.)
 The pipe that branches to the right (circled in red in this paragraph's pic)
feeds the two standpipes at the
corners of the vineyard, plus the standpipe just outside the pumphouse
itself. Its green handle is labeled "Irrigation at garden & field".
Its shutoff valve was closed in the previous paragraph's pic. If you open
the right-hand branch's shutoff valve by turning its handle "in line"
with the pipe, water will then flow to the standpipes. In this paragraph's pic
the standpipes water is turned on. (Please turn the valve
off when you're done using the standpipes.)
 The various pumphouse supplies are kept in boxes in the hot tub house.
There's one box containing various things needed to "winterize" the
pumphouse (i.e. keep it from freezing). See
 Although there's a breaker box on the outside of the pumphouse that controls
individual things inside the pumphouse, I believe the main pumphouse
circuit breaker is in the garage breaker box
labeled "WELL" - see finger to the right.
 The Pumphouse Winter box should contain the following items:
 Unplug one of the clamp-on lights from its "block", take it into the house,
and plug it into a normal outlet.
Within 30 seconds you should be able to feel the black bulb heat up.
(Be careful, it gets very hot.)
As soon as you feel the
bulb heating up you can unplug the lamp. This verifies that a) the lamp
is turned on, and b) the black bulb still works. (The on/off switch on the lamp
has been taped "on".) If the lamp fails to heat, try replacing the black bulb. Troubleshoot as needed.
When heat verified, plug the lamp back into its "block" and repeat this step with the
second clamp-on lamp.
 Plug the "top" of the assemblage into the outlet on the wall - as shown in the pic
to the right.
 Clamp one of the lamps on the block of wood on the wall beside the blue filter assembly.
Clamp the other lamp onto a vertical white plastic pipe. Both lamps should be pointing
"down" towards the water pipes running along the floor. They should look something
like the pic to the right.
 Get the open box of pumphouse filters off the shelf in the hot tub house.
In addition to filters, the box contains some tools, lube, and spare large black O-rings.
 From the open box gather a new filter, the 2 large
plastic wrenches, the sponge, the
little bottle of lube, and head down to the pumphouse. (Bucket optional.)
Open the pumphouse door (padlock combo is 0000) and step inside. Watch
out for the rat traps.
 Turn the main house water off using the green handle labeled "Household water".
The pic to the right shows it "off".
 Push down on the red button on top of the blue filter housing to
release the water pressure.
 Turn the standpipe water on using the green handle labeled "Irrigation at garden & field".
(You're going to use the standpipe
outside the pumphouse to wash the blue filter housing.)
The pic to the right shows it "on".
 Slide both plastic wrenches up the right side of the blue filter
housing from the bottom, then push the handles hard to the left.
Repeat until it turns easily. (You are unscrewing the blue filter
housing from the white top.)
 Once the blue filter housing turns easily,
remove the plastic wrenches, then finish unscrewing the blue housing
by hand, being careful not to drop it when it detaches. Water will
spill everywhere - this part is messy.
 Carry the blue housing outside and remove the large black O-ring and
the old filter. (If the O-ring is damaged in any way, go back to the
hot tub house and get a new O-ring from the box of pumphouse filters.)
 Wash the empty blue housing out using water from the standpipe and the sponge.
 Put some of the silicon lube from the small bottle onto your fingers and
lube the O-ring and the top lip of the blue container.
 Place the new filter into the blue container. (Both ends of the filter are
identical, so it doesn't matter which end is up.)
 Screw the blue container back into the white top part by hand,
and then tighten gently but securely using the black plastic wrenches.
 Using the green handles that you messed with above,
turn the main house water back on, and the standpipe back off.
The pic to the right shows the house water "on" and the standpipe "off".